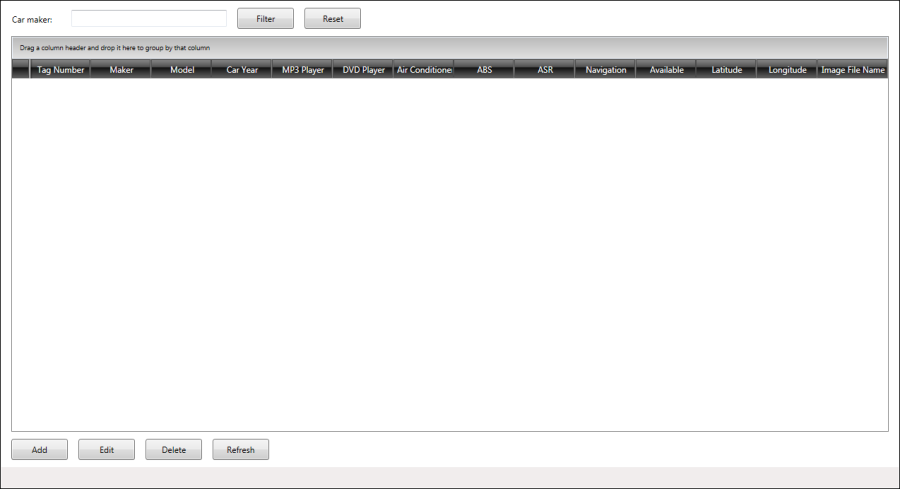
Defining the User Interface of MainWindow
This article is relevant to entity models that utilize the deprecated Visual Studio integration of Telerik Data Access. The current documentation of the Data Access framework is available here.
In this step you will add the UI controls to MainWindow

-
In the XAML view of MainWindow, in the opening Window tag add the namespace for Telerik RadControls for WPF:
xmlns:telerik="http://schemas.telerik.com/2008/xaml/presentation" -
In the opening tag of the Window element__ set the Title to be Sofia Car Rental. Set the MinHeight and Height to 720. Set the MinWidth and Width to be 1280.
Title="Sofia Car Rental" Height="720" Width="1280" MinHeight="720" MinWidth="1280" -
Withing the Window element add the following Resources:
<Window.Resources> <local:NullableBooleanConverter x:Key="booleanConverter" /> <Style x:Key="checkBoxColStyle" TargetType="telerik:GridViewCell"> <Setter Property="HorizontalContentAlignment" Value="Center" /> </Style> </Window.Resources> -
In the Window element add a Grid layout element with one column and four rows:
<Grid HorizontalAlignment="Stretch" VerticalAlignment="Stretch" Width="Auto"> <Grid.ColumnDefinitions> <ColumnDefinition Width="*"/> </Grid.ColumnDefinitions> <Grid.RowDefinitions> <RowDefinition Height="50"/> <RowDefinition /> <RowDefinition Height="50"/> <RowDefinition Height="30"/> </Grid.RowDefinitions> </Grid> -
In the first row of the Grid layout add a Label with content Car maker:
<Label Grid.Row="0" Grid.Column="0" HorizontalAlignment="Left" Margin="11,13,0,10" > Car maker:</Label> -
In the first row of the Grid layout add a TextBox and bind it to property named CarMakerFilter with TwoWay mode:
<TextBox Grid.Row="0" Grid.Column="0" HorizontalAlignment="Left" Margin="100,13,0,13" Width="220" Text="{Binding Path=CarMakerFilter, Mode=TwoWay}"/> -
In the first row of the Grid layout add two Buttons with content Filter and Reset. Bind them to properties FilterCarsCommand and ResetFilterCommand respectively:
<Button Grid.Row="0" Grid.Column="0" HorizontalAlignment="Left" Margin="335,10,0,10" Width="80" Content="Filter" Command="{Binding Path=FilterCarsCommand}"/> <Button Grid.Row="0" Grid.Column="0" HorizontalAlignment="Left" Margin="430,10,0,10" Width="80" Content="Reset" Command="{Binding Path=ResetFilterCommand}"/> -
In the second row of the Grid layout add a RadGridView. Bind its ItemSource to property CarsToDisplay in OneWay mode and its SelectedItem to property SelectedCar in TwoWay mode:
<telerik:RadGridView Grid.Row="1" Grid.Column="0" HorizontalAlignment="Stretch" Margin="15,0,15,0" CanUserDeleteRows="False" CanUserInsertRows="False" IsReadOnly="True" IsFilteringAllowed="False" ScrollViewer.HorizontalScrollBarVisibility="Hidden" ColumnWidth="*" SelectionMode="Single" SelectionUnit="FullRow" AutoGenerateColumns="False" GroupRenderMode="Flat" AutoExpandGroups="True" IsSynchronizedWithCurrentItem="True" ItemsSource="{Binding Path=CarsToDisplay, Mode=OneWay}" SelectedItem="{Binding Path=SelectedCar, Mode=TwoWay}"> </telerik:RadGridView> -
In the RadGridView element, you will need to define the columns which will be displayed as well as their bindings:
<telerik:RadGridView.Columns> <telerik:GridViewDataColumn TextAlignment="Left" HeaderTextAlignment="Center" DataMemberBinding="{Binding Path=TagNumber, Mode=OneWay}" Header="Tag Number"/> <telerik:GridViewDataColumn TextAlignment="Left" HeaderTextAlignment="Center" DataMemberBinding="{Binding Path=Make, Mode=OneWay}" Header="Maker"/> <telerik:GridViewDataColumn TextAlignment="Left" HeaderTextAlignment="Center" DataMemberBinding="{Binding Path=Model, Mode=OneWay}" Header="Model"/> <telerik:GridViewDataColumn TextAlignment="Right" HeaderTextAlignment="Center" DataMemberBinding="{Binding Path=CarYear, Mode=OneWay}" Header="Car Year"/> <telerik:GridViewCheckBoxColumn TextAlignment="Center" HeaderTextAlignment="Center" DataMemberBinding="{Binding Path=Mp3Player, Mode=OneWay, Converter={StaticResource ResourceKey=booleanConverter}}" Header="MP3 Player" CellStyle="{StaticResource ResourceKey=checkBoxColStyle}"/> <telerik:GridViewCheckBoxColumn TextAlignment="Center" HeaderTextAlignment="Center" DataMemberBinding="{Binding Path=DVDPlayer, Mode=OneWay, Converter={StaticResource ResourceKey=booleanConverter}}" Header="DVD Player" CellStyle="{StaticResource ResourceKey=checkBoxColStyle}"/> <telerik:GridViewCheckBoxColumn TextAlignment="Center" HeaderTextAlignment="Center" DataMemberBinding="{Binding Path=AirConditioner, Mode=OneWay, Converter={StaticResource ResourceKey=booleanConverter}}" Header="Air Conditioner" CellStyle="{StaticResource ResourceKey=checkBoxColStyle}"/> <telerik:GridViewCheckBoxColumn TextAlignment="Center" HeaderTextAlignment="Center" DataMemberBinding="{Binding Path=ABS, Mode=OneWay, Converter={StaticResource ResourceKey=booleanConverter}}" Header="ABS" CellStyle="{StaticResource ResourceKey=checkBoxColStyle}"/> <telerik:GridViewCheckBoxColumn TextAlignment="Center" HeaderTextAlignment="Center" DataMemberBinding="{Binding Path=ASR, Mode=OneWay, Converter={StaticResource ResourceKey=booleanConverter}}" Header="ASR" CellStyle="{StaticResource ResourceKey=checkBoxColStyle}"/> <telerik:GridViewCheckBoxColumn TextAlignment="Center" HeaderTextAlignment="Center" DataMemberBinding="{Binding Path=Navigation, Mode=OneWay, Converter={StaticResource ResourceKey=booleanConverter}}" Header="Navigation" CellStyle="{StaticResource ResourceKey=checkBoxColStyle}"/> <telerik:GridViewCheckBoxColumn TextAlignment="Center" HeaderTextAlignment="Center" DataMemberBinding="{Binding Path=Available, Mode=OneWay, Converter={StaticResource ResourceKey=booleanConverter}}" Header="Available" CellStyle="{StaticResource ResourceKey=checkBoxColStyle}"/> <telerik:GridViewDataColumn TextAlignment="Right" HeaderTextAlignment="Center" DataMemberBinding="{Binding Path=Latitude, Mode=OneWay}" DataFormatString="{}{0:f6}" Header="Latitude"/> <telerik:GridViewDataColumn TextAlignment="Right" HeaderTextAlignment="Center" DataMemberBinding="{Binding Path=Longitude, Mode=OneWay}" DataFormatString="{}{0:f6}" Header="Longitude"/> <telerik:GridViewDataColumn MinWidth="100" TextAlignment="Left" HeaderTextAlignment="Center" DataMemberBinding="{Binding Path=ImageFileName, Mode=OneWay}" Header="Image File Name"/> </telerik:RadGridView.Columns> -
In the third row of the Grid layout add four Buttons with content Add, Edit, Delete and Refresh. Bind them to properties AddCarCommand, EditCarCommand, DeleteCarCommand and RefreshCommand respectively:
<Button Grid.Row="2" Grid.Column="0" HorizontalAlignment="Left" Margin="15,10,0,10" Width="80" Content="Add" Command="{Binding Path=AddCarCommand}"/> <Button Grid.Row="2" Grid.Column="0" HorizontalAlignment="Left" Margin="110,10,0,10" Width="80" Content="Edit" Command="{Binding Path=EditCarCommand}"/> <Button Grid.Row="2" Grid.Column="0" HorizontalAlignment="Left" Margin="205,10,0,10" Width="80" Content="Delete" Command="{Binding Path=DeleteCarCommand}"/> <Button Grid.Row="2" Grid.Column="0" HorizontalAlignment="Left" Margin="300,10,10,10" Width="80" Content="Refresh" Command="{Binding Path=RefreshCommand}"/> -
In the fourth row of the Grid layout add a StatusBar with a Label inside it. The label should be bound to property Status in OneWay mode:
<StatusBar Grid.Column="0" Grid.Row="3" Grid.ColumnSpan="6"
           Height="30">
    <Label Content="{Binding Path=Status, Mode=OneWay}"/>
</StatusBar>
