Adding and Editing Cars
This article is relevant to entity models that utilize the deprecated Visual Studio integration of Telerik Data Access. The current documentation of the Data Access framework is available here.
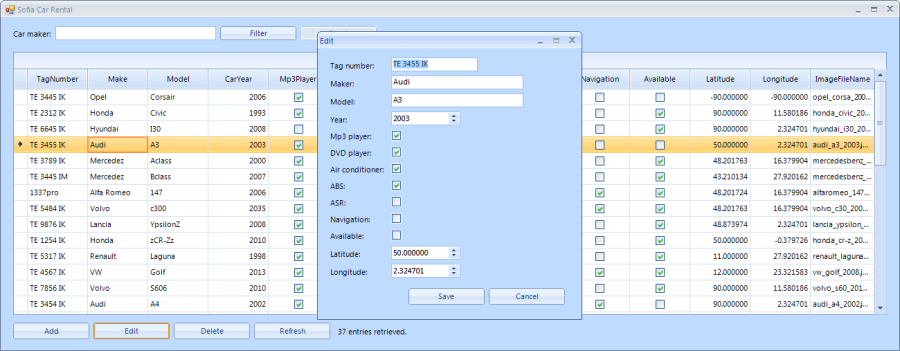
In this step you will implement functionality which will allow you to edit existing cars or add new ones to the database. To do this, you will need to call AddEditForm from MainForm and will write code in both forms.
Implementing add and edit logic in AddEditForm
-
In the Code view of AddEditForm you will need to add a private field and a public property for it, representing the database Id of the car which will be edited.
private int? selectedCarId;
public int? SelectedCarId
{
    get
    {
        return this.selectedCarId;
    }
    set
    {
        this.selectedCarId = value;
    }
}
Private _selectedCarId As Integer? Public Property SelectedCarId As Integer? Get Return Me._selectedCarId End Get Set(value As Integer?) Me._selectedCarId = value End Set End Property -
You will also need private fields for the car object which will be edited or added and for the Telerik Data Accesscontext.
private Car car;
private SofiaCarRentalContext context;
Private _car As Car Private _context As SofiaCarRentalContext -
Generate the Load event handler by double clicking the AddEditForm. In it you need to initialize the context, and initialize the car object depending on whether a car Id has been passed to the form or not. If a car Id has been passed, the form will be in edit mode, if no card Id is passed, the form is in add mode. The BindControlsToCar() method is called to display the data about the car.
private void AddEditForm_Load(object sender, EventArgs e)
{
    this.context = new SofiaCarRentalContext();
    if (this.SelectedCarId.HasValue)
    {
        this.car = this.context.Cars.FirstOrDefault(car => car.CarID == this.SelectedCarId.Value);
        this.Text = "Edit";
    }
    else
    {
        this.car = new Car();
        this.Text = "Add";
    }
    this.BindControlsToCar();
}
Private Sub AddEditForm_Load(sender As Object, e As EventArgs) Handles MyBase.Load Me._context = New SofiaCarRentalContext If Me.SelectedCarId.HasValue Then Me._car = Me._context.Cars.FirstOrDefault(Function(car) car.CarID = Me.SelectedCarId.Value) Me.Text = "Edit" Else Me._car = New Car() Me.Text = "Add" End If Me.BindControlsToCar() End Sub -
The BindControlsToCar() method takes the values from the properties of the car object and displays the in the form`s controls.
private void BindControlsToCar()
{
    this.rtbMaker.Text = this.car.Make;
    this.rtbModel.Text = this.car.Model;
    this.rtbTagNumber.Text = this.car.TagNumber;
    if (this.car.CarYear.HasValue)
    {
        this.rseCarYear.Value = this.car.CarYear.Value;
    }
    else
    {
        this.rseCarYear.Value = DateTime.Now.Year;
    }
    this.rcbAbs.Checked = this.car.ABS.GetValueOrDefault(false);
    this.rcbAsr.Checked = this.car.ASR.GetValueOrDefault(false);
    this.rcbMp3.Checked = this.car.Mp3Player.GetValueOrDefault(false);
    this.rcbDvd.Checked = this.car.DVDPlayer.GetValueOrDefault(false);
    this.rcbNavigation.Checked = this.car.Navigation.GetValueOrDefault(false);
    this.rcbAirCond.Checked = this.car.AirConditioner.GetValueOrDefault(false);
    this.rcbAvailable.Checked = this.car.Available.GetValueOrDefault(false);
    this.rseLatitude.Value = (decimal)this.car.Latitude.GetValueOrDefault(0.000000d);
    this.rseLongitude.Value = (decimal)this.car.Longitude.GetValueOrDefault(0.000000d);
}
Private Sub BindControlsToCar() Me.rtbTagNumber.Text = Me._car.TagNumber Me.rtbMaker.Text = Me._car.Make Me.rtbModel.Text = Me._car.Model If Me._car.CarYear.HasValue Then Me.rseCarYear.Value = Me._car.CarYear.Value Else Me.rseCarYear.Value = DateTime.Now.Year.ToString() End If Me.rcbMp3.Checked = Me._car.Mp3Player.GetValueOrDefault(False) Me.rcbDvd.Checked = Me._car.DVDPlayer.GetValueOrDefault(False) Me.rcbAirCond.Checked = Me._car.AirConditioner.GetValueOrDefault(False) Me.rcbAbs.Checked = Me._car.ABS.GetValueOrDefault(False) Me.rcbAsr.Checked = Me._car.ABS.GetValueOrDefault(False) Me.rcbNavigation.Checked = Me._car.Navigation.GetValueOrDefault(False) Me.rcbAvailable.Checked = Me._car.Available.GetValueOrDefault(False) Me.rseLatitude.Value = Me._car.Latitude.GetValueOrDefault(0.0) Me.rseLongitude.Value = Me._car.Longitude.GetValueOrDefault(0.0) End Sub -
In the Design view of AddEditForm double click the Save button to generate its Click event handler. Here the values from the UI controls are assigned to the car object`s properties. Depending on whether the form is in edit mode or in add mode, the changes to the car are saved or a new car is added to the database.
private void rbtnSave_Click(object sender, EventArgs e)
{
    try
    {
        this.SetCarProperties();
    }
    catch (Exception ex)
    {
        RadMessageBox.Show("Saving operation failed! Provided car information is invalid! Exception message: \n\r" +
            ex.Message, "Error", MessageBoxButtons.OK, RadMessageIcon.Error);
        this.DialogResult = DialogResult.None;
        return;
    }
    if (this.SelectedCarId.HasValue == false)
    {
        this.context.Add(this.car);
    }
    try
    {
        this.context.SaveChanges();
        this.Close();
    }
    catch (DataStoreException ex)
    {
        this.HandleExceptionOnSaveChanges(ex.BackendError.Description);
        return;
    }
    catch (DuplicateKeyException ex)
    {
        this.HandleExceptionOnSaveChanges(ex.BackendError.Description);
        return;
    }
    catch (Exception ex)
    {
        this.HandleExceptionOnSaveChanges(ex.Message);
        return;
    }
}
Private Sub rbtnSave_Click(sender As Object, e As EventArgs) Handles rbtnSave.Click Try Me.SetCarProperties() Catch ex As Exception RadMessageBox.Show("Saving operation failed! Provided car information is invalid! Exception message:" + vbCrLf + ex.Message, "Error", MessageBoxButtons.OK, RadMessageIcon.Error) Me.DialogResult = DialogResult.None Exit Sub End Try If Me.SelectedCarId.HasValue = False Then Me._context.Add(Me._car) End If Try Me._context.SaveChanges() Me.Close() Catch ex As DataStoreException Me.HandleExceptionOnSaveChanges(ex.BackendError.Description) Exit Sub Catch ex As DuplicateKeyException Me.HandleExceptionOnSaveChanges(ex.BackendError.Description) Exit Sub Catch ex As Exception Me.HandleExceptionOnSaveChanges(ex.Message) Exit Sub End Try End Sub -
The SetCarProperties() method takes the values in the UI controls on AddEditForm and assigns them to the respective properties of the car object.
private void SetCarProperties()
{
    this.car.Make = string.IsNullOrEmpty(this.rtbMaker.Text.Trim()) ? null : this.rtbMaker.Text.Trim();
    this.car.Model = string.IsNullOrEmpty(this.rtbModel.Text.Trim()) ? null : this.rtbModel.Text.Trim();
    this.car.TagNumber = string.IsNullOrEmpty(this.rtbTagNumber.Text.Trim()) ? null : this.rtbTagNumber.Text.Trim();
    this.car.CarYear = (short)this.rseCarYear.Value;
    this.car.ABS = this.rcbAbs.Checked;
    this.car.ASR = this.rcbAsr.Checked;
    this.car.Mp3Player = this.rcbMp3.Checked;
    this.car.DVDPlayer = this.rcbDvd.Checked;
    this.car.Navigation = this.rcbNavigation.Checked;
    this.car.AirConditioner = this.rcbAirCond.Checked;
    this.car.Available = this.rcbAvailable.Checked;
    this.car.Latitude = (double)this.rseLatitude.Value;
    this.car.Longitude = (double)this.rseLongitude.Value;
}
Private Sub SetCarProperties() Me._car.TagNumber = If(String.IsNullOrEmpty(Me.rtbTagNumber.Text.Trim()), Nothing, Me.rtbTagNumber.Text.Trim()) Me._car.Make = If(String.IsNullOrEmpty(Me.rtbMaker.Text.Trim()), Nothing, Me.rtbMaker.Text.Trim()) Me._car.Model = If(String.IsNullOrEmpty(Me.rtbModel.Text.Trim()), Nothing, Me.rtbModel.Text.Trim()) Me._car.CarYear = Me.rseCarYear.Value Me._car.Mp3Player = Me.rcbMp3.Checked Me._car.DVDPlayer = Me.rcbDvd.Checked Me._car.AirConditioner = Me.rcbAirCond.Checked Me._car.ABS = Me.rcbAbs.Checked Me._car.ASR = Me.rcbAsr.Checked Me._car.Navigation = Me.rcbNavigation.Checked Me._car.Available = Me.rcbAvailable.Checked Me._car.Latitude = Me.rseLatitude.Value Me._car.Longitude = Me.rseLongitude.Value End Sub -
The HandleExceptionOnSaveChanges() method is used to display messages whenever an exception occurs from the call to SaveChanges().
private void HandleExceptionOnSaveChanges(string exceptionMessage)
{
    RadMessageBox.Show("Saving operation failed! Internal error has occured. Exception message: \n\r" +
        exceptionMessage,
        "Error", MessageBoxButtons.OK, RadMessageIcon.Error);
    this.DialogResult = DialogResult.None;
}
Private Sub HandleExceptionOnSaveChanges(ByVal exceptionMessage As String) RadMessageBox.Show("Saving operation failed! Internal error has occured. Exception message:" + vbCrLf + exceptionMessage, "Error", MessageBoxButtons.OK, RadMessageIcon.Error) Me.DialogResult = DialogResult.None End Sub -
Gnerate the Click event handler for the Cancel button. All you need to do here is call the form`s Close() method.
private void rbtnCancel_Click(object sender, EventArgs e)
{
    this.Close();
}
Private Sub rbtnCancel_Click(sender As Object, e As EventArgs) Handles rbtnCancel.Click Me.Close() End Sub -
It is very important to call the Dispose() method of the context object in the form`s Closing event handler.
private void AddEditForm_FormClosing(object sender, FormClosingEventArgs e)
{
    if (this.context != null)
    {
        this.context.Dispose();
    }
}
Private Sub AddEditForm_FormClosing(sender As Object, e As FormClosingEventArgs) Handles MyBase.FormClosing If IsNothing(Me._context) = False Then Me._context.Dispose() End If End Sub
Calling AddEditForm
Depending on how its called, AddEditForm will give you the ability to either add a new car to the database or edit an existing one. To call AddEdtForm in edit mode, you must pass it the Id of the car you want to edit. To call the form in add mode, nothing needs to be passed.
-
From the Design view of MainForm double click the Add button to generate its Click event handler. Here need to initialize AddEditForm without passing a car Id. If the add operation is successful, the information displayed on the grid will be updated.
private void rbtnAddCar_Click(object sender, EventArgs e)
{
    AddEditForm addForm = new AddEditForm() { SelectedCarId = null, Owner = this };
    addForm.StartPosition = FormStartPosition.CenterParent;
    if (addForm.ShowDialog() == DialogResult.OK)
    {
        this.PopulateBindingSource();
    }
}
Private Sub rbtnAddCar_Click(sender As Object, e As EventArgs) Handles rbtnAddCar.Click Dim addForm As New AddEditForm() With {.Owner = Me, .SelectedCarId = Nothing} addForm.StartPosition = FormStartPosition.CenterParent Dim addResult As DialogResult = addForm.ShowDialog() If addResult = DialogResult.OK Then Me.PopulateBindingSource() End If End Sub From the Design view of MainForm double click the Edit button to generate its Click event handler. Initialize the AddEditForm with the Id of the car which you want to edit. The information displayed on the grid is updated if the edit operation succeeds.
private void rbtnEditCar_Click(object sender, EventArgs e)
{
    Car selectedCar = this.SelectedCar;
    AddEditForm editForm = new AddEditForm() { SelectedCarId = selectedCar.CarID, Owner = this };
    editForm.StartPosition = FormStartPosition.CenterParent;
    if (editForm.ShowDialog() == DialogResult.OK)
    {
        this.PopulateBindingSource();
    }
}
Private Sub rbtnEditCar_Click(sender As Object, e As EventArgs) Handles rbtnEditCar.Click
    Dim editForm As New AddEditForm() With {.Owner = Me, .SelectedCarId = Me.SelectedCar.CarID}
    editForm.StartPosition = FormStartPosition.CenterParent
    Dim editResult As DialogResult = editForm.ShowDialog()
    If editResult = DialogResult.OK Then
        Me.PopulateBindingSource()
    End If
End Sub
Checkpoint
Your sample application can now add new or edit existing cars in the database.