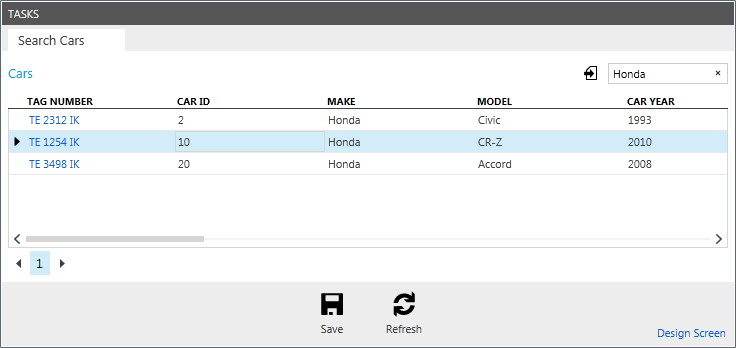
Visual Studio LightSwitch with WCF RIA
This article is relevant to entity models that utilize the deprecated Visual Studio integration of Telerik Data Access. The current documentation of the Data Access framework is available here.
In this walkthrough you will learn how to create a Silverlight application with WCF RIA Services and Telerik Data Access, using many of the features of Visual Studio 2012.
Create a Project
The first step in creating a LightSwitch application is to create a new project:
- Open Visual Studio 2012, on the File menu, click New Project. The New Project dialog box appears.
- In the Installed Templates list, select the LightSwitch node.
- Select either LightSwitchApplication (VB) or LightSwitchApplication (C#).
-
In the Name field, type SofiaCarRentalDemo and then click OK.

-
The SofiaCarRentalDemo Designer appears, and the necessary folders for your project are added to the Solution Explorer. Close the designer.

Create WCF RIA Class Library
The next step is to create a reusable WCF RIA Class Library. For that purpose:
- On the File menu, point Add, and then click New Project.
- In the Installed Templates list, select the Silverlight node.
- Change the .NET Framework version from 4.5 to 4.0.
- Select WCF RIA Services Class Library. This will add a new project for creating a WCF RIA Services class library that can be consumed by a Silverlight application.
-
In the Name field, type SofiaCarRentalWCFRIA and then click OK.

-
The Solution Explorer should have the following structure:
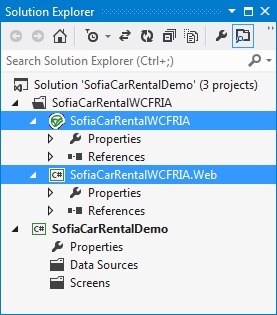
-
In the SofiaCarRentalWCFRIA.Web project add a new Telerik Data Access Domain Model. Name the model SofiaCarRentalDomainModel. In the Create Model Wizard, perform the following steps:
- In the Select Domain Model Type screen, choose Populate from database. Enter SofiaCarRentalDbContext for Model name.
- In the Setup Database Connection screen, create a data connection to the SofiaCarRental database and click Next.
- In the Choose Database Items screen, select all the tables.
-
Click Finish. Persistent classes are generated for the tables.

Build your solution.
- In the SofiaCarRentalWCFRIA.Web project add a new Telerik Data Access Domain Service. Name it SofiaCarRentalDomainService.tt. The Telerik RIA Wizard will start.
- In the Select Metadata Source Type screen, select the Rlinq file option.
- Click Next to proceed to the Configure Domain Service Endpoints screen.
- In the Available metadata sources drop-down, select the SofiaCarRentalDomainModel.rlinq entry.
- Make sure that the Enable client access is checked.
- Check the Enable and Enable Edit settings for all entities exposed by the SofiaCarRentalDomainModel.rlinq.
- In the Domain service name textbox type SofiaCarRentalDomainService.
-
Click Finish. The domain service class is generated.

-
Open the SofiaCarRentalDomainService.generated.cs file. In order to use WCF RIA Service with LightSwitch application, one has to have default query methods in the service. This is done by attributing all GetXXX method with a Query attribute as follow:
[EnableClientAccess()]
public partial class SofiaCarRentalDomainService : OpenAccessDomainService<SofiaCarRentalDbContext>
{
    [Query(IsDefault=true)]
    public IQueryable<RentalRate> GetRentalRates()
    {
     return this.DataContext.RentalRates;
    }
}
Although this will work for the current demo, there is one significant disadvantage. The SofiaCarRentalDomainService class is generated by a code-generation template. Each time, you save the template your manual changes made to the class will be lost. The best solution is to modify the template to add the Query attribute during the code generation. Open the SofiaCarRentalDomainService.tt file. Locate the following code fragment:
public IQueryable<<#=classType#>> Get<<#=className#>()
{
    return this.DataContext.<#=className#>;
}
And modify it, so it looks like:
[Query(IsDefault=true)]
public IQueryable<<#=classType#>> Get<#=className#>()
{
    return this.DataContext.<#=className#>;
}
Build your solution again.
Create a new DataSource
The next step is to add a new data source to your LightSwitch project:
-
In the Solution Explorer, select the SofiaCarRentalDemo project. Right-click on the DataSource folder and select Add Data Source.

-
In the Attach Data Source Wizard dialog box, select WCF RIA Services and click Next to proceed.
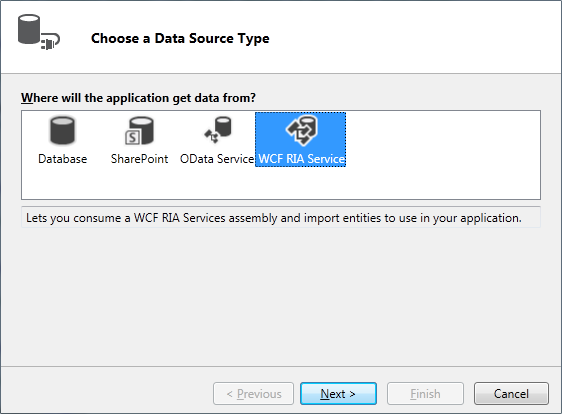
-
On the next page, click the Add Reference button. The Add Reference dialog box appears. Add a reference to the SofiaCarRentalWCFRIA.Web project.

-
In the final page of the wizard, include all entities exposed by the SofiaCarRentalDomainService.
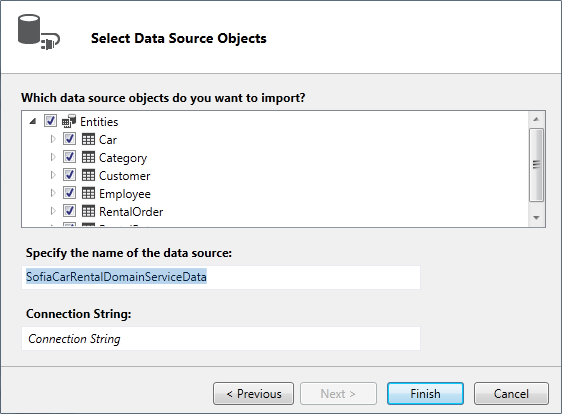
-
Click Finish to add the data source.

-
At this point your solution is not buildable. If you try to build your project now, you will receive several errors. You should perform several steps manual, in order to have buildable project.

-
In the Solution Explorer, select the SofiaCarRentalDemo project and switch to the File View.

-
Again in Solution Explorer, select the SofiaCarRentalDemo project and click the Show All Files option. Right now your solution explorer should look like the snapshot below:
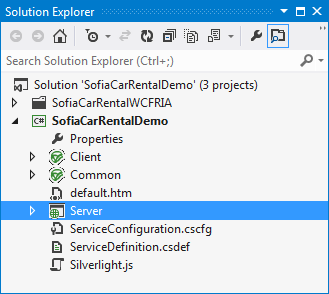
Expand the Server project and add reference Telerik.OpenAccess.dll, Telerik.OpenAccess.35.Extensions.dll and Telerik.OpenAccess.Ria.Extensions.dll assemblies.
- Build your project. Your project should be buildable.
-
The final step is to copy and paste the Telerik Data Access connection string from the App.config file in the SofiaCarRentalWCFRIA.Web project to the Web.config file in the Server project.
<connectionStrings>
  <add name="_IntrinsicData"
       connectionString="Data Source=.\SQLEXPRESS;
                         AttachDbFilename=|DataDirectory|\DevelopmentDatabase.mdf;
                         Integrated Security=True;
                         Connect Timeout=30;
                         User Instance=True;
                         MultipleActiveResultSets=True" />
  <add name="SofiaCarRentalDbConnection"
       connectionString="data source=.\SQLEXPRESS;
                         initial catalog=SofiaCarRental_v2.2;
                         integrated security=True"
       providerName="System.Data.SqlClient" />
</connectionStrings>
Select the SofiaCarRentalDemo project in the Solution Explorer and switch to the Logical View.
Create a Search Screen
In the next step, you will create a screen for searching cars from the SofiaCarRental database:
-
In the SofiaCarRentalDemo project click the Screen nodes, right-click and select Add Screen.
The Add New Screen dialog box opens.
In the Add New Screen dialog box, select Search Data Screen in the Select a screen template list.
Select the Screen Data drop-down list and select Cars, and then click OK.

The Screen Designer opens, displaying a hierarchical representation of the screen layout.
-
Press F5 to start the application.
