How to: Create a Domain Model
This article is relevant to entity models that utilize the deprecated Visual Studio integration of Telerik Data Access. The current documentation of the Data Access framework is available here.
In this topic you will learn how to set up a Telerik Data Access project for use with Oracle database. You will use the Visual Designer to design your model classes first, and then you will generate the corresponding Oracle database schema. Telerik Data Access gives you the ability to create a conceptual model first and then derive the storage model (the database). This is also known as a model-first scenario. For more information about the model-first development, you could read the Model First Scenario tutorial.
Installing the Oracle ODP.NET Driver
Telerik Data Access uses the ADO.NET (Oracle.DataAcces.Client) Provider from Oracle called ODP.NET. In order to create a new domain model based on a Oracle database, you have to install the ODP.NET Driver from Oracle. You can download it from here.
Creating a New Empty Domain Model
For this tutorial, you will need to create a new Telerik Data Access ClassLibrary project named OracleData. Telerik Data Access Class Library is a Visual Studio project template that allows you to create a library of persistent classes generated by Telerik Data Access. You can use the Telerik Data Access Class Library template to quickly create a Telerik Data Access Domain Model that can be shared with other projects.
- Start Visual Studio, on the File menu select New, and then select Project.
- In the New Project dialog box, select Visual Basic or Visual C# as the programming language.
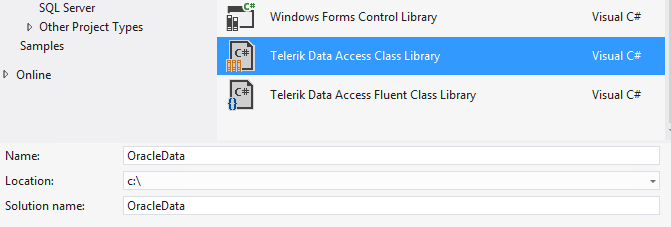
- In the Templates pane, select Telerik Data Access Class Library project.
-
Type OracleData as the name of the project. Click OK.
-
The Telerik Data Access New Domain Model wizard appears. In the Select Domain Model Type screen, select Empty domain model. Select Oracle in the Select backend option. You can change various settings related to code generation, naming, etc. in the following pages. For the purpose of this demo, accept the default settings and click Finish.

-
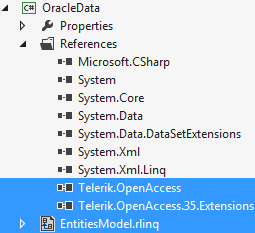
The wizard adds the EntitiesModel.rlinq file to the OracleData project. Also references to the Telerik.OpenAccess.dll and Telerik.OpenAccess.35.Extensions.dll assemblies are added.
Building Your Domain Model
Now, you are ready to start modeling your domain classes. Double-click the EntitiesModel.rlinq file to open it in the Visual Designer. Open the Toolbox pane. For this demo, you will need to create two entities. You can create entities by dragging the Domain Class object from the toolbox into the Visual Designer. Drag a Domain Class item from the toolbox into the Visual Designer. This will create a new Entity called DomainClass1, without any properties, as shown on the figure below.

Select the first entity in the Visual Designer and rename it to Employee (by pressing the F2 key). Name the second entity Company.
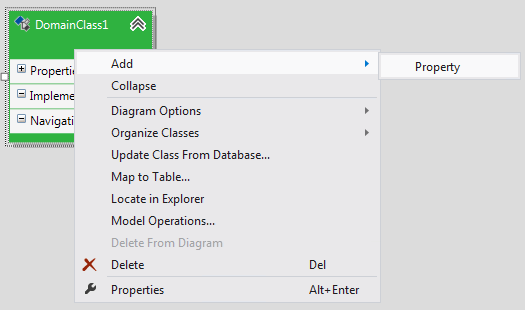
The next step is to define properties for the Employee entity. Properties can be added by right-clicking on the entity and selecting Add -> Property.
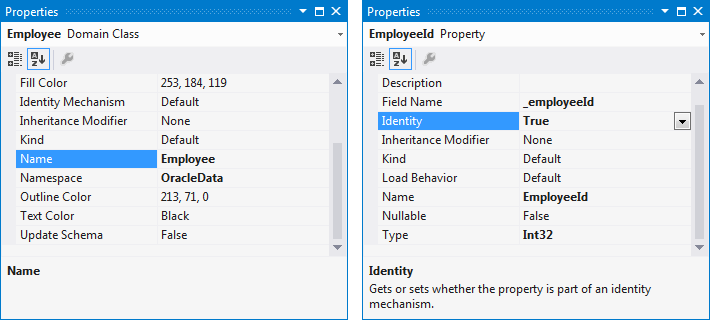
First define the primary key for the entity. Each time you add an entity to the Visual Designer, you will have to define a primary key column. Add a new property and name it EmployeeId. Each time you add a new property, the default type for the property is System.String. Select the EmployeeId property and press F4 to open the Properties pane. Change the Type of the EmployeeId property from String to Int32. Set the Identity property to True, indicating that this column is used as a primary key for the current entity. You can also specify whether it can be nullified.
You are going to add one more property to this entity and define properties for the Company entity as well to finish of this example. But first, add a new property to the Employee entity called EmployeeName. Use the default data type (String) for this property. For the Company entity, add the following properties and their types:
- CompanyId (Int32). Mark the property as a primary key, i.e. set the Identity property to True.
- CompanyName (String).

If you don't specify a primary key, Telerik Data Access will create automatically a primary key column during the database update.
Saving the Model
The model is finished, but when you save it and take a look at the Error List pane, you should be presented with the warnings shown in the next figure.

These warnings are completely valid, and the information is absolutely correct. These warnings are letting you know that the items in the Visual Designer are not mapped to anything. The project will save and compile as-is, since these are warnings, but beyond having your conceptual model you really don't have anything substantial.
Creating Associations and Navigation Properties
You are almost done. The next thing you need to do is add relationships, or associations. From the toolbox select the Association item and create association between the Employee and Company by clicking the Employee entity first and then the Company entity. This will open the Association Editor dialog.

Here you could specify the name of the association and the names of the navigation properties. Take a look at the Relational View section. The Relation View section describes the database part of the story, i.e. the database tables that participates in the association. You will see that all options are set to (Default). That is normal since you haven't created the underlying database yet and Telerik Data Access doesn't know the corresponding tables. When you click OK, a new one-to-many association between the Employee and Company entities will be created. Additionally, two new properties will be added to the Employee and Company entities. The Employee entity will have a reference to the Company. You can use the Employee.Company property to access the Company instance that is associated with an instance of the Employee entity. On the other side, the Company entity will have a reference to a list of Employees. You can access the Employee instances via the Company.Employees property. Note that you have an option whether to generate the Employees property or not.
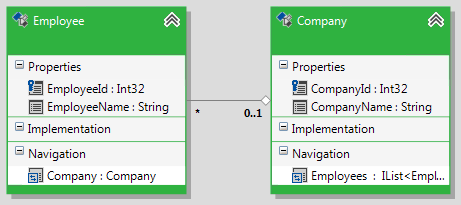
When you are all done, your model should look like:
Creating Mappings and Database
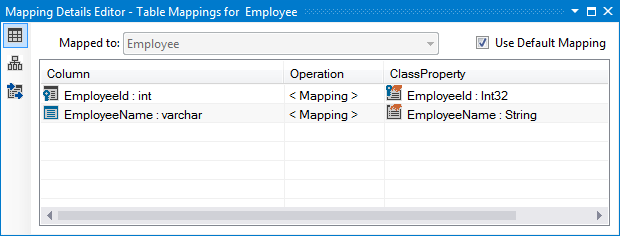
Here is the moment where the model first feature of Telerik Data Access comes into play. The next step is to map all entities to tables. Select the Employee entity in the Visual Designer and open the Mapping Details Editor (View->Other Windows->Entity Diagrams Details Editor). In the Table Mappings section, check the Use Default Mapping option.
Do the same of the Company entity.
In this demo, default mapping will be used, i.e. Telerik Data Access will take care about the property-to-column mapping. Or in other words, Telerik Data Access will generate automatically the names of the corresponding database columns.
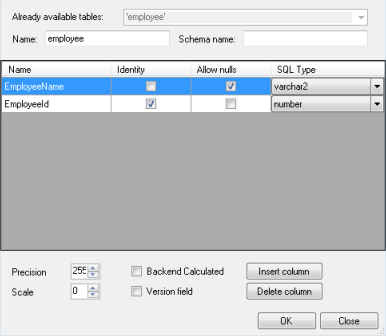
If you want to change the default column names, you need to use the Edit Table dialog. For example, select the Employee entity in the Visual Designer, right-click it and select Edit Table. This will open the Edit Table dialog. You could experiment and change the column names.
Now that you have designed our domain model it’s time to generate the database for it. Right click anywhere on the surface of the Visual Designer. Select the Update Database from Model command. This will start the Telerik Data Access Schema Update Wizard.
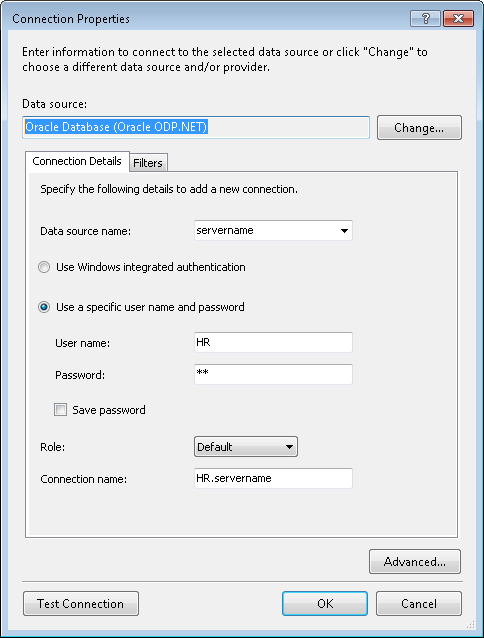
The first page in the wizard lets you specify the data connection for your domain model. If you don’t have a connection configured yet, you can do this by pressing the "New Connection" button. There you have the ability to select your Provider (in our case the ODP.NET Provider). Afterwards you can specify the server name and the appropriate credentials. Press the Test Connection button to check if your connection is configured successfully.
Click OK to close the dialog. You will get taken back to the data connection page of the wizard with your new connection shown in the connection drop-down. You have to specify the name of the connection string. This should be a unique name, which identifies the connection string in the <connectionStrings> </connectionStrings> section of the App.Config or Web.Config file (depending on the project type). Click Next to proceed.
On the next page you have to specify the Update Strategy. Since you are initializing your database schema for first time, select the Create Database option. However once your database schema is initialized, each time you want to update it again, you have to use the Migrate Database.
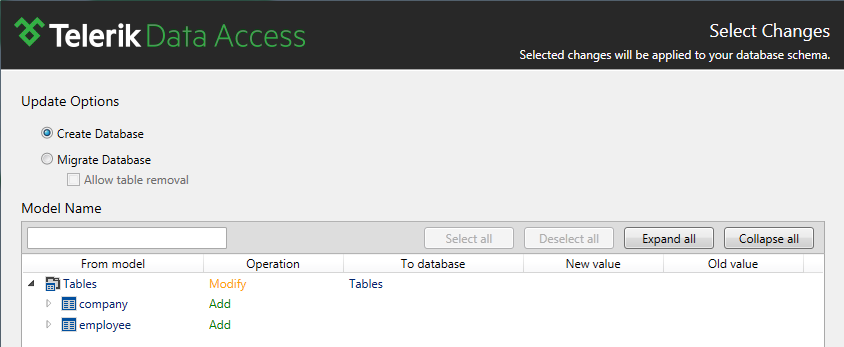
Click Next. This will lead to the next step where you get a generated DDL for your domain model. Pressing the Execute Script button will execute this script against our database.