Converting Existing Projects to Telerik Apps
This article demonstrates how to enable the Progress® Telerik® UI for Blazor components in your existing Blazor app with a few mouse clicks. The supported integration is helpful if you already have a substantial app, or if you want to use the Microsoft templates to start with features like authentication and add the UI components later.
To add the Telerik UI components to your existing Blazor application, use the Convert Project Wizard. The wizard detects all installed versions of Telerik UI for Blazor and lists them in the Version combobox—this feature enables you to start your project with the desired version. To make sure you are up to date, you can also get the latest version.
The Convert Project Wizard automates a set of steps that you otherwise must perform manually.
The wizard adds the following client assets to your project:
The wizard also configures the project to use the Telerik UI for Blazor components by adding the following utilities:
-
Required
@usingdirectives to the~/_Imports.razorfile. -
TelerikLayout.razorcomponent at the root level of the DOM. - Registration for the Telerik services for client-side projects, for server-side projects, and for hybrid projects.
Getting the Wizard
To use the Convert Project Wizard, install the Telerik UI for Blazor Visual Studio (VS) extensions. You can get the extension from:
- The Visual Studio Marketplace (for Visual Studio 2022 for Windows and Visual Studio 2019 for Windows).
- The Telerik UI for Blazor automated installer (for Windows and Mac).
- Your Telerik.com account (for Mac only). Download the
.mpackfile and use the "Install from file..." button on the Visual Studio Extensions dialog.
Our extention for Visual Studio for Mac will be discontinued in 2024 after Visual Studio for Mac is discontinued.
Starting the Wizard
To start the wizard, use either of the following options:
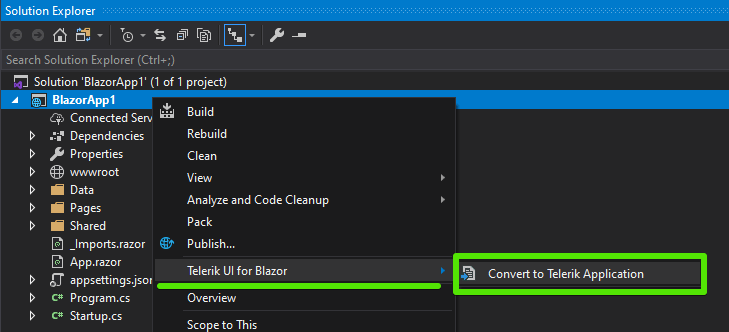
Project Context Menu
- In the Solution Explorer, select the Blazor app where you want to add the Telerik components (either WebAssembly, or Server-side Blazor).
- Right-click the project node and, then, select Telerik UI for Blazor > Convert to Telerik Application.
- Follow the instructions.
Start the Convert Project Wizard from the project context menu
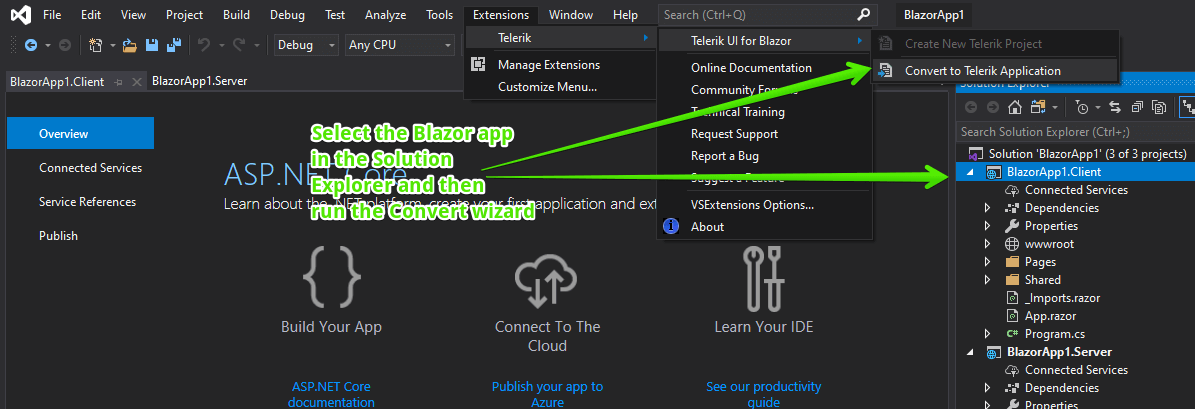
Extensions Menu
Alternatively, instead of the context menu, you can use the VS Extensions menu at the top:
- In the Solution Explorer, select the Blazor app where you want to add the Telerik components (either WebAssembly, or Server-side Blazor).
- Open the Extensions menu.
- Click Telerik > Telerik UI for Blazor > Convert to Telerik Application.
- Follow the instructions.
Start the Convert Project Wizard from the Extensions menu
Features
The wizard provides you with the following options:
- The ability to download the latest available version.
- A version selector so you can choose a particular version to add to the project.
- A list with the versions found on your machine that you can choose from.
- Whether to back up the project state before the conversion (in a folder called
<ProjectName>_Backup>_<timestamp>).
The Convert Project Wizard Options

Troubleshooting
When converting a project, you may encounter the following most common issues:
- The conversion wizard fails with an error screen.
- The Telerik components do not work after you run the converted project.
- An extra shared folder appears.
Error Screen
If you see an error screen similar to the one below, make sure that the actual Blazor application is selected in the Solution Explorer. This is most common with WebAssembly types of applications as they consist of a server and shared projects by default, and only the client project is the actual Blazor app that needs the Telerik components.
Some specific project settings can also cause an exception during conversion. The fastest solution is to manually configure the project for the Telerik components.
Error screen when the project can't be converted

Components Fail
The issue can manifest in a couple of ways:
- The components have no styling.
- There are JavaScript errors that Telerik objects cannot be found.
The most common reason for this problem is a mismatch between the installed version and the actual license that you have. For example:
- Only a trial version is installed on your development machine, but you already have a commercial license, yet you never installed the commercial version.
- The wizard did not properly detect the installed version.
The cause are wrong paths to the needed web assets. To resolve this open the index file:
-
wwwroot/index.htmlfor a WebAssembly and a Hybrid Blazor app -
~/Pages/_Host.cshtmlfor a Server-Side Blazor app using .NET 3.x or .NET 5 -
~/Pages/_Layout.cshtmlfor a Server-Side Blazor app using.NET 6
Look for the comments left by the wizard. The comments are in the <head> near the Telerik assets and show the correct paths for a trial and commercial license.
Extra Shared Folder
You may get a Shared folder that contains a TelerikLayout.razor file at an unexpected place in the project. This can happen if a folder in the project was selected instead of the project itself when running the convert wizard.
The fix is to move the TelerikLayout.razor file to the original Shared folder of your project, next to the MainLayout.razor file.