AutoCompleteTextView for Xamarin.iOS: Getting Started
This quick start tutorial demonstrates how to create a simple iOS application with TKAutoCompleteTextView.
Setting up TKAutoCompleteTextView
Now that our project is created and the TelerikUI.framework is added, we can start referencing and using the TelerikUI types:
Add the using statement to the view controller:
using TelerikUI;
In the ViewDidLoad method of your view controller prepare a small array of sample data to be presented as suggestions in TKAutoCompleteTextField.
public partial class ViewController : UIViewController
{
    public ViewController(IntPtr handle) : base (handle)
    {
    }

    public override void ViewDidLoad()
    {
        base.ViewDidLoad();

        NSString[] sampleArrayOfStrings = new NSString[] { new NSString("Kristina Wolfe"),
            new NSString("Freda Curtis"),
            new NSString("Jeffery Francis"),
            new NSString("Eva Lawson"),
            new NSString("Emmett Santos"),
            new NSString("Theresa Bryan"),
            new NSString("Jenny Fuller"),
            new NSString("Terrell Norris"),
            new NSString("Eric Wheeler"),
            new NSString("Julius Clayton"),
            new NSString("Alfredo Thornton"),
            new NSString("Roberto Romero"),
            new NSString("Orlando Mathis"),
            new NSString("Eduardo Thomas"),
            new NSString("Harry Douglas")
        };
    }
}
Next, create an instance of TKDataSource. This component is used to feed TKAutoCompleteTextView with our data. Now we need to go through the items of the source array and create TKAutoCompleteToken objects with which the TKAutoCompleteTextView component operates.
this.dataSource = new TKDataSource(sampleArrayOfStrings);
this.dataSource.Settings.AutoComplete.CreateToken((index, item) => new TKAutoCompleteToken((NSString) item));
Then create a new instace of TKAutoCompleteTextView and add it as a subview of the ViewController's main view. The AutoresizingMask property is set in order to allow correct resizing of the list view when the device is rotated in landscape mode.
TKAutoCompleteTextView autocomplete = new TKAutoCompleteTextView(new CoreGraphics.CGRect(10, 80, this.View.Bounds.Width - 20, 30));
autocomplete.WeakDataSource = this.dataSource;
autocomplete.AutoresizingMask = UIViewAutoresizing.FlexibleWidth;

this.View.AddSubview(autocomplete);
Set up the MinimumCharactersToSearch property which defines after what number of entered symbols the autocomplete should start suggesting. Set also the SuggestionViewHeight property which sets the height of the suggestions presenting view.
autocomplete.MinimumCharactersToSearch = 1;
autocomplete.SuggestionViewHeight = this.View.Bounds.Size.Height/2;
So far we have got the following view:

You can change the suggestion logic in order to control which suggestions to be shown. You can show suggestions which contain the typed phrase or suggestions that start with that phrase. The CompletionMode property is used to control the suggesting logic. The default behaviour is showing suggestions which start with the typed in phrase.
this.dataSource.Settings.AutoComplete.CompletionMode = TKAutoCompleteCompletionMode.StartsWith;
This will result in:
For more information about the completion modes, please refer to the Completion Modes article
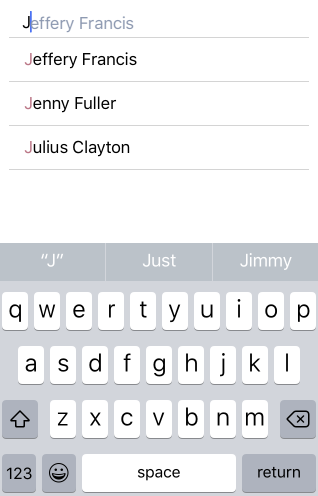
Finally, right now we get suggestions in a drop-down and we have to tap one of them to perform selection. What will make the auto completion process even easier is if, in addition to the drop-down with suggestions, we get a single suggestion that is shown in the text view part of TKAutoCompleteTextView which we can easily select with a single keyboard stroke. This behavior is defined by the so called SuggestMode, and in order to get the described functionality, let's set the SuggestMode to SuggestAppend:
autocomplete.SuggestMode = TKAutoCompleteSuggestMode.SuggestAppend;
The result will be:
Here is the completed example:
using Foundation;
using System;
using UIKit;
using TelerikUI;

public partial class ViewController : UIViewController
{
    private TKDataSource dataSource;

    public ViewController(IntPtr handle) : base (handle)
    {
    }

    public override void ViewDidLoad()
    {
        base.ViewDidLoad();
        // Perform any additional setup after loading the view, typically from a nib.

        NSString[] sampleArrayOfStrings = new NSString[] { new NSString("Kristina Wolfe"),
            new NSString("Freda Curtis"),
            new NSString("Jeffery Francis"),
            new NSString("Eva Lawson"),
            new NSString("Emmett Santos"),
            new NSString("Theresa Bryan"),
            new NSString("Jenny Fuller"),
            new NSString("Terrell Norris"),
            new NSString("Eric Wheeler"),
            new NSString("Julius Clayton"),
            new NSString("Alfredo Thornton"),
            new NSString("Roberto Romero"),
            new NSString("Orlando Mathis"),
            new NSString("Eduardo Thomas"),
            new NSString("Harry Douglas")
        };

        this.dataSource = new TKDataSource(sampleArrayOfStrings);
        this.dataSource.Settings.AutoComplete.CreateToken((index, item) => new TKAutoCompleteToken((NSString) item));

        this.AutomaticallyAdjustsScrollViewInsets = false;

        TKAutoCompleteTextView autocomplete = new TKAutoCompleteTextView(new CoreGraphics.CGRect(10, 80, this.View.Bounds.Width - 20, 30));
        autocomplete.AutoresizingMask = UIViewAutoresizing.FlexibleWidth;
        autocomplete.WeakDataSource = this.dataSource;

        autocomplete.MinimumCharactersToSearch = 1;
        autocomplete.SuggestionViewHeight = this.View.Bounds.Size.Height / 2;

        this.View.AddSubview(autocomplete);
    }
}
For more information about the suggest modes, please refer to the Suggest Modes article
AutoCompleteTextView Getting Started example can be found in our Native Xamarin.iOS examples.