Installing Telerik UI for Xamarin from MSI file
To install Telerik UI for Xamarin on your machine from the Windows Installer MSI file, follow the instructions below:
Please, make sure you have already read the System Requirements article before you proceed.
Go to the Telerik UI for Xamarin download page following the instructions in Download Product Files topic.
Download the automatic installation (MSI) file.
Once the download completes, run the MSI file and follow the instructions. On a 32bit machine the wizard will install the UI for Xamarin component in the following folder unless you specify otherwise: C:\Program Files\Progress\ or C:\Program Files (x86)\Progress\ for a 64bit machine.
If you prefer using the ZIP file with the dlls instead of the automatic installation you can download it from the Telerik UI for Xamarin product download page.
Exploring the installation folder
If you open the installation folder you will probably note the following sub directories:
- Binaries
- Examples - here you can find the SDK Browser application as well as sample applications demonstrating our controls for Xamarin.Android and Xamarin.iOS.
- LicenseAgreements - provides the product EULA.
- QSF - includes the full source of Telerik UI for Xamarin Samples Application.
- VSExtensions - includes our Visual Studio Extension package. For more details go to Visual Studio Extensions topic.
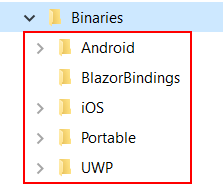
Binaries folder contains all the Telerik UI for Xamarin assemblies grouped in folders according to the target project they should be added to. Check the exact structure in the image below: