Shape Reader
The RadMap allows you to read data from several data formats and wrap it in MapShape objects. The currently supported formats are:
This topic will explain the following:
Reading Files
The RadMap control supports the visualization of ESRI Shapefiles and KML Data. It reads the data via the MapShapeReader class implemented in the Information Layer.
<telerik:RadMap x:Name="radMap">
    <telerik:InformationLayer x:Name="informationLayer">
        <telerik:InformationLayer.Reader>
            <telerik:MapShapeReader />
        </telerik:InformationLayer.Reader>
    </telerik:InformationLayer>
</telerik:RadMap>
this.informationLayer.Reader = new MapShapeReader();
Me.informationLayer.Reader = New MapShapeReader()
To specify the type of the data the reader should read use the SourceType property of the MapShapeReader class. It can have the following values:
Auto - automatically determines the type of the data.
KML - specifies that the file to be read, contains KML Data.
Shapefile - specifies that the file to be read contains Shapefile data.
To learn how to specify the files for each of the types read the respective topics:
Specifying a Tooltip
The MapShapeReader object can use the data in the .dbf file and display it in a tooltip for the respective shape. In order to allow you to configure the tooltip's appearance and content, The MapShapeReader class exposes the following properties:
ToolTipFormat - allows you to specify the format string for the tooltip. This is the simplest way to configure the tooltip, when having a one-line tooltip scenario.
ToolTipStyle - allows you to apply a Style that targets the ToolTip control.
ToolTipTemplate - allows you to define a DataTemplate for the tooltip. This one is used when more complex, multiline and styled tooltip scenarios.
ToolTipFormat
Using the ToolTipFormat property is the simplest way to create a single-line tooltip. The property is of type string and allow you to display both the value of a single property of the extended data and combination of the values of different extended data properties.
To access the value of an extended data property use its name.
Here is an examples for different ToolTipFormat values.
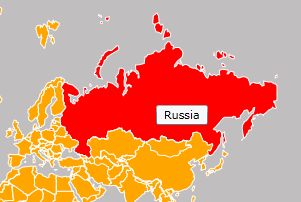
Single property value
<telerik:RadMap x:Name="radMap">
    <telerik:InformationLayer x:Name="informationLayer">
        <telerik:InformationLayer.Reader>
            <telerik:MapShapeReader DataSource="/Silverlight.Help.RadMapSamples;component/Data/world.dbf"
                                    Source="/Silverlight.Help.RadMapSamples;component/Data/world.shp"
                                    ToolTipFormat="CNTRY_NAME" />
        </telerik:InformationLayer.Reader>
    </telerik:InformationLayer>
</telerik:RadMap>
this.informationLayer.Reader.ToolTipFormat = "CNTRY_NAME";
Me.informationLayer.Reader.ToolTipFormat = "CNTRY_NAME";
Here is a snapshot of the result:
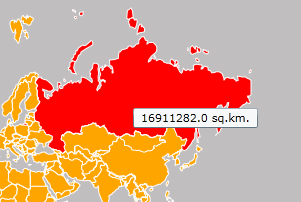
Formatted property value
Note that in this case the format string begins with "{}". This escapes the following {PropertyName} expressions. In code behind you mustn't add it to the actual format string.
<telerik:RadMap x:Name="radMap">
    <telerik:InformationLayer x:Name="informationLayer">
        <telerik:InformationLayer.Reader>
            <telerik:MapShapeReader DataSource="/Silverlight.Help.RadMapSamples;component/Data/world.dbf"
                                    Source="/Silverlight.Help.RadMapSamples;component/Data/world.shp"
                                    ToolTipFormat="{}{SQKM|F2} sq.km." />
        </telerik:InformationLayer.Reader>
    </telerik:InformationLayer>
</telerik:RadMap>
this.informationLayer.Reader.ToolTipFormat = "{SQKM|F2} sq.km.";
Me.informationLayer.Reader.ToolTipFormat = "{SQKM|F2} sq.km.";
Here is a snapshot of the result:
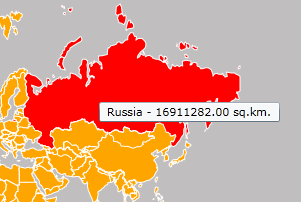
Multiple formatted property values
Note that in this case the format string begins with "{}". This escapes the following {PropertyName} expressions. In code behind you mustn't add it to the actual format string.
<telerik:RadMap x:Name="radMap">
    <telerik:InformationLayer x:Name="informationLayer">
        <telerik:InformationLayer.Reader>
            <telerik:MapShapeReader DataSource="/Silverlight.Help.RadMapSamples;component/Data/world.dbf"
                                    Source="/Silverlight.Help.RadMapSamples;component/Data/world.shp"
                                    ToolTipFormat="{}{CNTRY_NAME} - {SQKM|F2} sq.km." />
        </telerik:InformationLayer.Reader>
    </telerik:InformationLayer>
</telerik:RadMap>
this.informationLayer.Reader.ToolTipFormat = "{CNTRY_NAME} - {SQKM|F2} sq.km.";
Me.informationLayer.Reader.ToolTipFormat = "{CNTRY_NAME} - {SQKM|F2} sq.km."
Here is a snapshot of the result:
ToolTipStyle
The ToolTipStyle property allows you to specify a Style of the tooltip that gets displayed. The Style should target the ToolTip control. Here is an example.
To learn how to modify the color of the shapes like on the snapshot below, you have to read the Styling the Shapes section.
<telerik:RadMap x:Name="radMap">
    <telerik:InformationLayer x:Name="informationLayer">
        <telerik:InformationLayer.Reader>
            <telerik:MapShapeReader DataSource="/Silverlight.Help.RadMapSamples;component/Data/world.dbf"
                                    Source="/Silverlight.Help.RadMapSamples;component/Data/world.shp"
                                    ToolTipFormat="{}{CNTRY_NAME} - {SQKM|F2} sq.km.">
                <telerik:MapShapeReader.ToolTipStyle>
                    <Style TargetType="ToolTip">
                        <Setter Property="BorderBrush"
                                Value="Orange" />
                        <Setter Property="Background"
                                Value="Black" />
                        <Setter Property="Foreground"
                                Value="White" />
                    </Style>
                </telerik:MapShapeReader.ToolTipStyle>
            </telerik:MapShapeReader>
        </telerik:InformationLayer.Reader>
    </telerik:InformationLayer>
</telerik:RadMap>
Here is a snapshot of the result:

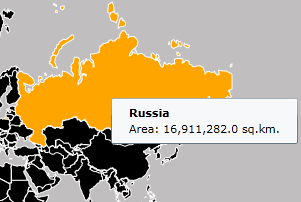
ToolTipTemplate
The ToolTipTemplate property allows you to define a DataTemplate for the tooltip. This way you are able to create more complex layouts like multiline content or content containing different visual elements like Borders, Images etc.
In this case the DataTemplate takes as DataContext the entire Extended Data Set. To get a specific value you have to bind to it and use a converter to access the desired attribute. The RadMap provides such converter out of the box. It is represented by the ExtendedDataConverter. To use it just bind to the extended data set and pass the desired attribute name as parameter. Here is an example.
The ToolTipTemplate property will take precedence over the ToolTipFormat one.
<UserControl.Resources>
    <telerik:ExtendedDataConverter x:Key="ExtendedDataConverter" />
</UserControl.Resources>
<telerik:RadMap x:Name="radMap">
    <telerik:InformationLayer x:Name="informationLayer">
        <telerik:InformationLayer.Reader>
            <telerik:MapShapeReader DataSource="/Silverlight.Help.RadMapSamples;component/Data/world.dbf"
                                    Source="/Silverlight.Help.RadMapSamples;component/Data/world.shp">
                <telerik:MapShapeReader.ToolTipTemplate>
                    <DataTemplate>
                        <StackPanel Margin="10,5">
                            <TextBlock FontWeight="Bold"
                                        Text="{Binding Converter={StaticResource ExtendedDataConverter}, ConverterParameter='CNTRY_NAME'}" />
                            <TextBlock Text="{Binding Converter={StaticResource ExtendedDataConverter}, ConverterParameter='SQKM', StringFormat='Area: {0:#,#.0} sq.km.'}" />
                        </StackPanel>
                    </DataTemplate>
                </telerik:MapShapeReader.ToolTipTemplate>
            </telerik:MapShapeReader>
        </telerik:InformationLayer.Reader>
    </telerik:InformationLayer>
</telerik:RadMap>
Here is a snapshot of the result:
Clearing the Layer
When adding the read shapes to the layer, the MapShapeReader is able to clear it first. This means that all previously added shapes will get removed and the new ones will be added. This behavior is controled by the ClearLayer property of the MapShapeLayer. It's default value is True. This means that the described behavior will be active by default. To disable it set the property to False.
Styling the Shapes
To modify the appearance of the shapes in terms of Fill, Stroke etc. you can either use the HighlightFill and Shape Fill properties of the InformationLayer or use the Colorizer property of the InformationLayer.