SchedulerPrintStyles
Printing in RadScheduler is performed by objects of type SchedulerPrintStyle. The print style object provides a set of options that define the date range of printing and the appearance of the printed pages.
SchedulerPrintStyle is an abstract class and cannot be instantiated directly. You should use one of the following implementations: SchedulerDailyPrintStyle,SchedulerWeeklyPrintStyle, SchedulerMonthlyPrintStyle, SchedulerDetailsPrintStyle.
When applying a specific PrintStyle make sure that you set the relevant ActiveViewType for RadScheduler.
To set a RadScheduler with a print style:
Daily Print Style
SchedulerPrintStyle schedulerPrintStyle = new SchedulerDailyPrintStyle();
this.radScheduler1.PrintStyle = schedulerPrintStyle;
Dim schedulerPrintStyle As New SchedulerDailyPrintStyle()
Me.RadScheduler1.PrintStyle = schedulerPrintStyle
SchedulerPrintStyle has the following properties:
- DateStartRange and DateEndRange: Allows you to specify the date range which should be printed:
Specify Date Range
schedulerPrintStyle.DateStartRange = DateTime.Today;
schedulerPrintStyle.DateEndRange = DateTime.Today.AddDays(6);
schedulerPrintStyle.DateStartRange = DateTime.Today
schedulerPrintStyle.DateEndRange = DateTime.Today.AddDays(6)
- TimeStartRange and TimeEndRange: Allows you to specify the time frame which for every day in the date range - i.e. the time frame which will be printed for each date in the date range period:
Specify Time Frame
schedulerPrintStyle.TimeStartRange = TimeSpan.FromHours(7);
schedulerPrintStyle.TimeEndRange = TimeSpan.FromHours(19);
schedulerPrintStyle.TimeStartRange = TimeSpan.FromHours(7)
schedulerPrintStyle.TimeEndRange = TimeSpan.FromHours(19)
- AppointmentFont, DateHeadingFont and PageHeadingFont allow you to specify the fonts for the appointments, dates and page headers respectively:
Set Font
schedulerPrintStyle.AppointmentFont = new Font("Segoe UI Light", 8, FontStyle.Regular);
schedulerPrintStyle.DateHeadingFont = new Font("Segoe UI Light", 12, FontStyle.Regular);
schedulerPrintStyle.PageHeadingFont = new Font("Segoe UI Light", 16, FontStyle.Regular);
schedulerPrintStyle.AppointmentFont = New Font("Segoe UI Light", 8, FontStyle.Regular)
schedulerPrintStyle.DateHeadingFont = New Font("Segoe UI Light", 12, FontStyle.Regular)
schedulerPrintStyle.PageHeadingFont = New Font("Segoe UI Light", 16, FontStyle.Regular)
- You can also specify which visual parts of the page to be printed - page title, calendar in the page title, notes area, etc:
Specify Visual Parts
schedulerPrintStyle.DrawPageTitle = true;
schedulerPrintStyle.DrawPageTitleCalendar = true;
schedulerPrintStyle.ShowLinedNotesArea = true;
schedulerPrintStyle.ShowNotesArea = true;
schedulerPrintStyle.DrawPageTitle = True
schedulerPrintStyle.DrawPageTitleCalendar = True
schedulerPrintStyle.ShowLinedNotesArea = True
schedulerPrintStyle.ShowNotesArea = True
- To modify the size of the visual areas use:
Area Size
schedulerPrintStyle.NotesAreaWidth = 200;
schedulerPrintStyle.HeadingAreaHeight = 100;
schedulerPrintStyle.NotesAreaWidth = 200
schedulerPrintStyle.HeadingAreaHeight = 100
DailyStyle
Figure 1: SchedulerDailyPrintStyle
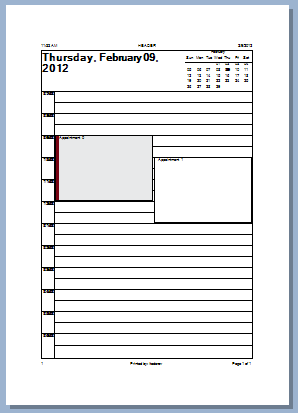
The SchedulerDailyPrintStyle class defines printing of RadScheduler in a daily manner. Each day is displayed on a separate page. The appointments are arranged in a grid similarly to the SchedulerDayView. The SchedulerDailyPrintStyle provides properties for changing the size of its specific visual parts: the hours column on the left and the area for all day appointments. Additionally, you can allow printing two pages per day. The second page in the mode is reserved for notes.
Set SchedulerDailyPrintStyle
SchedulerDailyPrintStyle dailyStyle = new SchedulerDailyPrintStyle();
dailyStyle.HoursColumnWidth = 100;
dailyStyle.MaxAllDayAreaHeight = 100;
dailyStyle.AllDayAppointmentHeight = 20;
dailyStyle.TwoPagesPerDay = true;
Dim dailyStyle As New SchedulerDailyPrintStyle()
dailyStyle.HoursColumnWidth = 100
dailyStyle.MaxAllDayAreaHeight = 100
dailyStyle.AllDayAppointmentHeight = 20
dailyStyle.TwoPagesPerDay = True
WeeklyCalendarStyle
Figure 2: SchedulerWeeklyCalendarPrintStyle
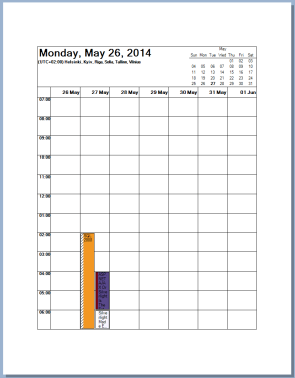
In the WeeklyCalendarPrintStyle the appointments are arranged in a grid where each column represents a day. And each row represents a specific time frame. This style provides properties for changing the dimensions of its visual parts and the font for the header cells.
HeaderCellFont: Allows the font of the header row to be changed.
HeaderAreaHeight: Controls the height of the header row.
HoursColumnWidth: Controls the width of the header column.
AllDayAppointmentHeight: Controls the width of the all day appointments section.
MaxAllDayAreaHeight: Sets the maximum height all day appointments section. The default value is 180 pixels.
Set SchedulerWeeklyCalendarPrintStyle
SchedulerWeeklyCalendarPrintStyle weeklyCalendarStyle = new SchedulerWeeklyCalendarPrintStyle();
weeklyCalendarStyle.AppointmentFont = new System.Drawing.Font("Segoe UI", 12, FontStyle.Regular);
weeklyCalendarStyle.HeadingAreaHeight = 120;
weeklyCalendarStyle.HoursColumnWidth = 30;
Dim weeklyCalendarStyle As New SchedulerWeeklyCalendarPrintStyle()
weeklyCalendarStyle.AppointmentFont = New System.Drawing.Font("Segoe UI", 12, FontStyle.Regular)
weeklyCalendarStyle.HeadingAreaHeight = 120
weeklyCalendarStyle.HoursColumnWidth = 30
WeeklyStyle
Figure 3: SchedulerWeeklyPrintStyle
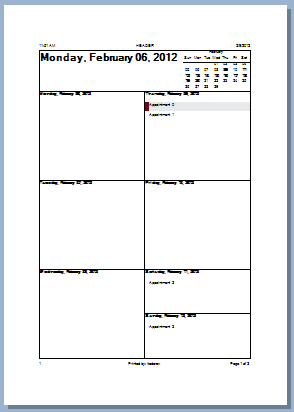
The SchedulerWeeklyPrintStyle class defines printing of RadScheduler in a weekly manner. Each week is displayed on a separate page. The appointments are arranged in a grid in which each cell represents a day of the week. The SchedulerWeeklyPrint provides properties for changing the height of the appointments and the layout of its visual parts.
ExcludeNonWorkingDays: Disables printing of non-working days
DaysLayout: Defines the flow direction of the cells
TwoPagesPerWeek: Allows printing a week in two pages separating the week in two.
Set SchedulerWeeklyPrintStyle
SchedulerWeeklyPrintStyle weeklyStyle = new SchedulerWeeklyPrintStyle();
weeklyStyle.ExcludeNonWorkingDays = true;
weeklyStyle.DaysLayout = WeeklyStyleLayout.TopToBottom;
weeklyStyle.TwoPagesPerWeek = true;
Dim weeklyStyle As New SchedulerWeeklyPrintStyle()
weeklyStyle.ExcludeNonWorkingDays = True
weeklyStyle.DaysLayout = WeeklyStyleLayout.TopToBottom
weeklyStyle.TwoPagesPerWeek = True
MonthlyStyle
Figure 4: SchedulerMonthlyPrintStyle
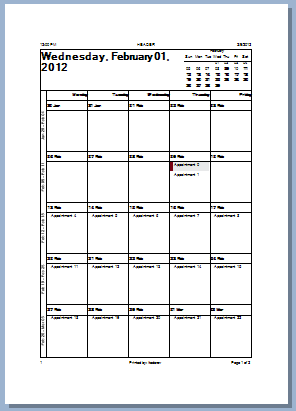
The SchedulerMonthlyPrintStyle class defines printing of RadScheduler in a monthly manner. Each month is displayed on a separate page. The appointments are arranged in a grid in which each cell represents a day of the month.
In this mode you can take advantage of the following properties:
ExcludeNonWorkingDays: Disable printing of non-working days
TwoPagesPerMonth: Separate the month in two pages
PrintExactlyOneMonth: Prints one month on a page
WeeksPerPage: Prints the number of defined weeks on a page
AppointmentHeight: Set the appointment height
VerticalHeaderWidth: Sets the vertical header width
CellHeaderHeight: Sets cell header height
Set SchedulerMonthlyPrintStyle
SchedulerMonthlyPrintStyle monthlyStyle = new SchedulerMonthlyPrintStyle();
monthlyStyle.ExcludeNonWorkingDays = true;
monthlyStyle.TwoPagesPerMonth = true;
monthlyStyle.PrintExactlyOneMonth = false;
monthlyStyle.WeeksPerPage = 4;
monthlyStyle.AppointmentHeight = 30;
monthlyStyle.CellHeaderHeight = 30;
monthlyStyle.VerticalHeaderWidth = 100;
Dim monthlyStyle As New SchedulerMonthlyPrintStyle()
monthlyStyle.ExcludeNonWorkingDays = True
monthlyStyle.TwoPagesPerMonth = True
monthlyStyle.PrintExactlyOneMonth = False
monthlyStyle.WeeksPerPage = 4
monthlyStyle.AppointmentHeight = 30
monthlyStyle.CellHeaderHeight = 30
monthlyStyle.VerticalHeaderWidth = 100
DetailsStyle
Figure 5: SchedulerDetailsPrintStyle
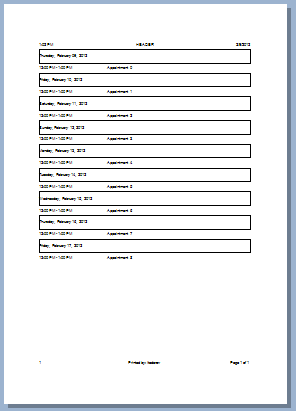
The SchedulerDetailsPrintStyle defines printing of RadScheduler in a continuous manner. Appointments are printed in ascending order of their start date. This mode does not provide page headers.
Similar to the previous modes, you can set properties that define the size of specific visual parts of the page. You can also specify the condition under which the printing should continue on the next page. Four page break modes are available:
Default: The printing continues to the next page there is no space left on the current page.
Day: The printing continues to the next page when the next appointment has a different date or there is no space left on the current page.
Week: The printing continues to the next page when the next appointment is in a different week or there is no space left on the current page.
Month: The printing continues to the next page when the next appointment is in a different month or there is no space left on the current page.
Set SchedulerDetailsPrintStyle
SchedulerDetailsPrintStyle detailsStyle = new SchedulerDetailsPrintStyle();
detailsStyle.AppointmentDateWidth = 200;
detailsStyle.AppointmentTitleHeight = 30;
detailsStyle.DayHeaderHeight = 60;
detailsStyle.PageBreakMode = PageBreakMode.Day;
Dim detailsStyle As New SchedulerDetailsPrintStyle()
detailsStyle.AppointmentDateWidth = 200
detailsStyle.AppointmentTitleHeight = 30
detailsStyle.DayHeaderHeight = 60
detailsStyle.PageBreakMode = PageBreakMode.Day