Tiles
RadTileElement represents a simple tile which can contain text and image and acts like a simple button. You can also add other elements to its Children collection programmatically.
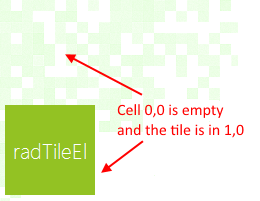
To set the location of a tile, set its Column and Row properties either at design time or via code. These values are zero based and describe the location cell in either the main panel or the group in which the tile is placed.
Set tile's position
this.radTileElement1.Row = 1;
this.radTileElement1.Column = 0;
Me.RadTileElement1.Row = 1
Me.RadTileElement1.Column = 0
RadPanorama uses dynamic number of columns, so you can set the Column property of a tile with a value, greater than the ColumnsCount value. However, setting the Row property with a value, greater than the RowsCount value, will result in an exception.
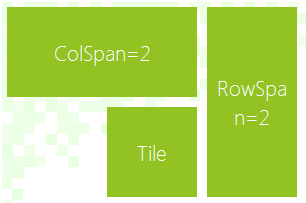
To change the span of a tile, set its RowSpan and ColSpan properties. The RowSpan property specifies how many cells of the row should be occupied by the tile. The ColSpan property specifies the number of cells in each column which the tile should occupy.
The CellPadding property specifies the offset of the tile according to the bounds of the cells. The following code snippet demonstrates using the RowSpan, ColSpan and CellPadding properties.
this.radTileElement1.RowSpan = 2;
this.radTileElement1.CellPadding = new Padding(5);
this.radTileElement2.ColSpan = 2;
this.radTileElement2.Column = 2;
this.radTileElement2.CellPadding = new Padding(5);
this.radTileElement3.Row = 1;
this.radTileElement3.Column = 1;
this.radTileElement3.CellPadding = new Padding(5);
Me.RadTileElement1.RowSpan = 2
Me.RadTileElement1.CellPadding = New Padding(5)
Me.RadTileElement2.ColSpan = 2
Me.RadTileElement2.Column = 2
Me.RadTileElement2.CellPadding = New Padding(5)
Me.RadTileElement3.Row = 1
Me.RadTileElement3.Column = 1
Me.RadTileElement3.CellPadding = New Padding(5)
Live Tiles
RadLiveTileElement extends the functionality of RadTileElement by providing means of displaying content that changes on a specified time interval.
To change the content element, you can edit the contents of the tiles' Items collection:
Add live tiles
radLiveTileElement1.Items.Add(new LightVisualElement()
{
    Text = "Movie Idea: Pirates of the Carribean"
});
radLiveTileElement1.Items.Add(new LightVisualElement()
{
    Text = "Movie Idea: Inception"
});
radLiveTileElement1.Items.Add(new LightVisualElement()
{
    Text = "Movie Idea: The Expendables"
});
radLiveTileElement1.Items.Add(new LightVisualElement()
{
    Text = "Movie Idea: Harry Potter and the Deathly Hallows"
});
RadLiveTileElement1.Items.Add(New LightVisualElement() With { _
    .Text = "Movie Idea: Pirates of the Carribean" _
})
RadLiveTileElement1.Items.Add(New LightVisualElement() With { _
    .Text = "Movie Idea: Inception" _
})
RadLiveTileElement1.Items.Add(New LightVisualElement() With { _
    .Text = "Movie Idea: The Expendables" _
})
RadLiveTileElement1.Items.Add(New LightVisualElement() With { _
    .Text = "Movie Idea: Harry Potter and the Deathly Hallows" _
})
The following properties are responsible for controlling the behavior of the transition between content elements:
Customize Animation
this.radLiveTileElement1.AnimationFrames = 15; //sets the number of frames in a transition
this.radLiveTileElement1.AnimationInterval = 30; //sets the interval between each frame in the transition in miliseconds
this.radLiveTileElement1.ContentChangeInterval = 7000; //sets the interval between each content change
this.radLiveTileElement1.TransitionType = ContentTransitionType.SlideUp; //sets the type of the transition animation
Me.RadLiveTileElement1.AnimationFrames = 15 'sets the number of frames in a transition
Me.RadLiveTileElement1.AnimationInterval = 30 'sets the interval between each frame in the transition in miliseconds
Me.RadLiveTileElement1.ContentChangeInterval = 7000 'sets the interval between each content change
Me.RadLiveTileElement1.TransitionType = ContentTransitionType.SlideUp 'sets the type of the transition animation

Populating with Tiles/Groups Programmatically
You can find below a sample code snippet demonstrating how to add groups to RadPanorama and fill the groups with tiles.
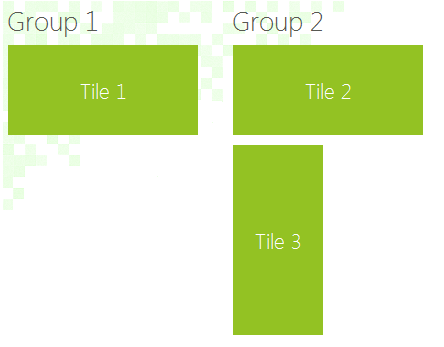
Populating With Data Programmatically
TileGroupElement group1 = new TileGroupElement();
group1.Text = "Group 1";
TileGroupElement group2 = new TileGroupElement();
group2.Text = "Group 2";
radPanorama1.Groups.Add(group1);
radPanorama1.Groups.Add(group2);
radPanorama1.ShowGroups = true;

RadTileElement tile1 = new RadTileElement();
tile1.Text = "Tile 1";
tile1.ColSpan = 2;
group1.Items.Add(tile1);

RadTileElement tile2 = new RadTileElement();
tile2.Text = "Tile 2";
tile2.ColSpan = 2;
group2.Items.Add(tile2);

RadTileElement tile3 = new RadTileElement();
tile3.Text = "Tile 3";
group2.RowsCount = 3;
tile3.Row = 1;
tile3.RowSpan = 2;
group2.Items.Add(tile3);
Dim group1 As New TileGroupElement()
group1.Text = "Group 1"
Dim group2 As New TileGroupElement()
group2.Text = "Group 2"
RadPanorama1.Groups.Add(group1)
RadPanorama1.Groups.Add(group2)
RadPanorama1.ShowGroups = True
Dim tile1 As New RadTileElement()
tile1.Text = "Tile 1"
tile1.ColSpan = 2
group1.Items.Add(tile1)
Dim tile2 As New RadTileElement()
tile2.Text = "Tile 2"
tile2.ColSpan = 2
group2.Items.Add(tile2)
Dim tile3 As New RadTileElement()
tile3.Text = "Tile 3"
group2.RowsCount = 3
tile3.Row = 1
tile3.RowSpan = 2
group2.Items.Add(tile3)