Docking a UserControl with custom event
This tutorial walks you through a real-world scenario that you can have in your application. At a high level, this scenario involves:
Docking the user controls inside RadDock.
Implementing events, methods and properties in the user controls which allow you to have communication between the forms/user controls.
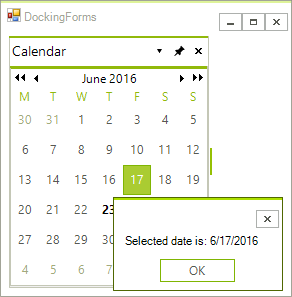
In our particular case we dock a user control instance inside a RadDock instance. The user control itself contains a RadCalendar. When the user clicks the RadCalendar a custom DateChanged event for the UserControl1 fires, showing a dialog with the selected date. Using this as a model you can create UserControls with custom properties, methods and events for more complex situations.
1. In Visual Studio create a new Windows Application.
2. Create a new UserControl - from the Solution Explorer, right-click the project node in the Solution Explorer and select "Add >> UserControl...". Name the new user control CalendarPanel.
3. Drop a RadCalendar on the CalendarPanel design surface.
4. Set the RadCalendar.Dock property to Fill.
5. In the Property Window locate the SelectionChanged event and double-click it to create an event handler.
6. Add a delegate and event to be surfaced by the CalendarPanel control when the date selection changes:
Setting up DateChanged Event
public delegate void DateChangedHandler(DateTime date);
public event DateChangedHandler DateChanged;
Public Delegate Sub DateChangedHandler(ByVal [date] As DateTime)
Public Event DateChanged As DateChangedHandler
In the SelectionChanged event handler add the following code:
Handling the RadCalendar SelectionChanged event
private void radCalendar1_SelectionChanged(object sender, EventArgs e)
{
    if (DateChanged != null)
    {
        DateChanged((sender as Telerik.WinControls.UI.RadCalendar).SelectedDate);
    }
}
Private Sub RadCalendar1_SelectionChanged(ByVal sender As System.Object, ByVal e As System.EventArgs) Handles RadCalendar1.SelectionChanged
    RaiseEvent DateChanged((TryCast(sender, RadCalendar)).SelectedDate)
End Sub
7. In the Solution Explorer, double-click the main form to open its design surface.
8. Drop a RadDock on the opened design surface. Set the Dock property to Fill.
9. Dock the CalendarPanel user control to RadDock in the form's Load event handler using the following code snippet:
Docking CalendarPanel user control in RadDock
CalendarPanel calendarPanel = new CalendarPanel();
HostWindow host = this.radDock1.DockControl(calendarPanel, Telerik.WinControls.UI.Docking.DockPosition.Left);
host.Text = "Calendar";
calendarPanel.DateChanged += calendarPanel_DateChanged;
Dim calendarPanel As New CalendarPanel()
Dim host As HostWindow = Me.RadDock1.DockControl(calendarPanel, Telerik.WinControls.UI.Docking.DockPosition.Left)
host.Text = "Calendar"
AddHandler calendarPanel.DateChanged, AddressOf calendarPanel_DateChanged
10. Add an event handler for the CalendarPanel DateChanged event:
Handling the Custom DateChanged event
void calendarPanel_DateChanged(DateTime date)
{
    RadMessageBox.Show("Selected date is: " + date.ToShortDateString());
}
Sub calendarPanel_DateChanged(ByVal [date] As DateTime)
    RadMessageBox.Show("Selected date is: " + [date].ToShortDateString())
End Sub
11. Press F5 to run the application. Click the cells in the calendar to display the date in a message dialog.