Getting Started with Silverlight NumericUpDown
This tutorial will walk you through the creation of a sample application that contains RadNumericUpDown.
Assembly References
In order to use RadNumericUpDown control in your projects you have to add references to the following assemblies:
- Telerik.Windows.Controls
- Telerik.Windows.Controls.Input
Adding RadNumericUpDown to the Project
Before proceeding with adding RadNumericUpDown to your project, make sure the required assembly references are added to the project.
You can add RadNumericUpDown manually by writing the XAML code in Example 1. You can also add the control by dragging it from the Visual Studio Toolbox and dropping it over the XAML view.
Example 1: Adding RadNumericUpDown in XAML
<telerik:RadNumericUpDown />
In order to use RadNumericUpDown in XAML you have to add the namespace declaration shown in Example 2:
Example 2: Declaring Telerik Namespace
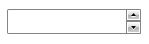
If you run the application you will see and empty RadNumericUpDown as demonstrated in Figure 1.xmlns:telerik="http://schemas.telerik.com/2008/xaml/presentation"
Figure 1: The empty RadNumericUpDown generated by the code in Example 1
The default Value of the RadNumericUpDown control is equal to null.
Binding Value
You can then bind RadNumericUpDown's Value to a property of your view model as well as customize it by setting its properties similarly to Example 3:
Example 3: Binding RadNumericUpDown's Value
<telerik:RadNumericUpDown Value="{Binding Clubs[0].StadiumCapacity}" Minimum="10000" Maximum="100000" SmallChange="1000" />
Setting a Theme
The controls from our suite support different themes. You can see how to apply a theme different than the default one in the Setting a Theme help article.
Changing the theme using implicit styles will affect all controls that have styles defined in the merged resource dictionaries. This is applicable only for the controls in the scope in which the resources are merged.
To change the theme, you can follow the steps below:
Choose between the themes and add reference to the corresponding theme assembly (ex: Telerik.Windows.Themes.Windows8.dll). You can see the different themes applied in the Theming examples from our Silverlight Controls Examples application.
-
Merge the ResourceDictionaries with the namespace required for the controls that you are using from the theme assembly. For the RadNumericUpDown, you will need to merge the following resources:
- Telerik.Windows.Controls
- Telerik.Windows.Controls.Input
Example 4 demonstrates how to merge the ResourceDictionaries so that they are applied globally for the entire application.
Example 4: Merge the ResourceDictionaries
<Application.Resources>
    <ResourceDictionary>
        <ResourceDictionary.MergedDictionaries>
            <ResourceDictionary Source="/Telerik.Windows.Themes.Windows8;component/Themes/System.Windows.xaml"/>
            <ResourceDictionary Source="/Telerik.Windows.Themes.Windows8;component/Themes/Telerik.Windows.Controls.xaml"/>
            <ResourceDictionary Source="/Telerik.Windows.Themes.Windows8;component/Themes/Telerik.Windows.Controls.Input.xaml"/>
        </ResourceDictionary.MergedDictionaries>
    </ResourceDictionary>
</Application.Resources>
Alternatively, you can use the theme of the control via the StyleManager.
Figure 2 shows a RadNumericUpDown with the Windows8 theme applied.
Figure 2: RadNumericUpDown with the Windows8 theme