Getting Started with Silverlight DateTimePicker
This tutorial will walk you through the creation of a sample application that contains RadDateTimePicker.
- Assembly References
- Adding RadDateTimePicker to the Project
- Working with Selected Values
- Manually Updating the Bound Property
- Setting a Theme
Before reading this tutorial you should get familiar with the Visual Structure of the RadDateTimePicker control.
Assembly References
In order to use RadDateTimePicker control in your projects you have to add references to the following assemblies:
- Telerik.Windows.Controls
- Telerik.Windows.Controls.Input
Adding RadDateTimePicker to the Project
You can add RadDateTimePicker to your application manually by writing the XAML code in Example 1. You can also add the control by dragging it from the Visual Studio Toolbox and dropping it over the XAML view.
Example 1: Adding RadDateTimePicker in XAML
<telerik:RadDateTimePicker />
In order to create the RadDateTimePicker control you have to include the following namespace declaration: xmlns:telerik="http://schemas.telerik.com/2008/xaml/presentation"
You can also create the RadDateTimePicker in code-behind:
Example 2: Adding RadDateTimePicker in code-behind
RadDateTimePicker radDateTimePicker = new RadDateTimePicker();
Dim radDateTimePicker As New RadDateTimePicker()
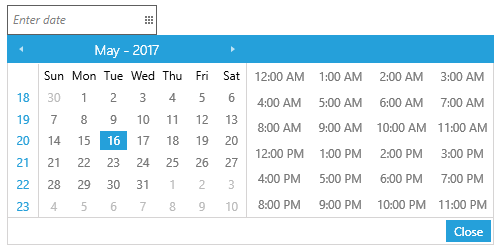
If you run the application now you will see the default RadDateTimePicker control with the default watermark content. Clicking on the control's drop down button will display a date and time representations from which you can select a single value.
Figure 1: The RadDateTimePicker created by the code in Example 1
Working with Selected Values
You can get the selected value using the following properties:
SelectedValue: A DateTime representation of the selected date and time or null if no value has been selected.
SelectedDate: The Date part of the currently selected value.
SelectedTime: The TimeOfDay part of the currently selected value.
Example 3: Getting the selected values
DateTime? userSelectedValue = radDateTimePicker.SelectedValue;
DateTime? userSelectedDate = radDateTimePicker.SelectedDate;
TimeSpan? userSelectedTime = radDateTimePicker.SelectedTime;
Dim userSelectedValue As System.Nullable(Of DateTime) = radDateTimePicker.SelectedValue
Dim userSelectedDate As System.Nullable(Of DateTime) = radDateTimePicker.SelectedDate
Dim userSelectedTime As System.Nullable(Of TimeSpan) = radDateTimePicker.SelectedTime
Normally you would want to bind the SelectedValue property to your data as demonstrated in Example 4.
Example 4: Binding SelectedValue
<telerik:RadDateTimePicker SelectedValue="{Binding Established}" />
Manually Updating the Bound Property
In case the bound property value needs to be manually updated at some state, the DateTimeText property of the control can simply be set to be equal to the CurrentDateTimeText one. The CurrentDateTimeText property is updated each time the user types in the textbox, whereas the DateTimeText is updated once the textbox has lost focus, for example.
Example 5: Manually updating the bound property
this.DateTimePicker.DateTimeText = this.DateTimePicker.CurrentDateTimeText;
Me.DateTimePicker.DateTimeText = Me.DateTimePicker.CurrentDateTimeText
Setting a Theme
The controls from our suite support different themes. You can see how to apply a theme different than the default one in the Setting a Theme help article.
Changing the theme using implicit styles will affect all controls that have styles defined in the merged resource dictionaries. This is applicable only for the controls in the scope in which the resources are merged.
To change the theme, you can follow the steps below:
Choose between the themes and add reference to the corresponding theme assembly (ex: Telerik.Windows.Themes.Windows8.dll). You can see the different themes applied in the Theming examples from our Silverlight Controls Examples application.
-
Merge the ResourceDictionaries with the namespace required for the controls that you are using from the theme assembly. For RadDateTimePicker, you will need to merge the following resources:
- Telerik.Windows.Controls
- Telerik.Windows.Controls.Input
Example 8 demonstrates how to merge the ResourceDictionaries so that they are applied globally for the entire application.
Example 5: Merge the ResourceDictionaries
    <Application.Resources>
        <ResourceDictionary>
            <ResourceDictionary.MergedDictionaries>
                <ResourceDictionary Source="/Telerik.Windows.Themes.Windows8;component/Themes/System.Windows.xaml"/>
                <ResourceDictionary Source="/Telerik.Windows.Themes.Windows8;component/Themes/Telerik.Windows.Controls.xaml"/>
                <ResourceDictionary Source="/Telerik.Windows.Themes.Windows8;component/Themes/Telerik.Windows.Controls.Input.xaml"/>
            </ResourceDictionary.MergedDictionaries>
        </ResourceDictionary>
    </Application.Resources>
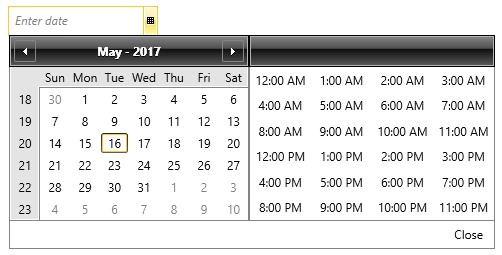
Figure 2 shows RadDateTimePicker with the Windows8 theme applied.
Figure 2: RadDateTimePicker with the Windows8 theme