DataBinding expressions
Often, when you use item templates, you want the controls in the template to display information associated with the menu item properties. For example, consider a simple menu with a check box in the item template:
<telerik:RadMenu RenderMode="Lightweight" ID="RadMenu1" runat="server" Flow="Horizontal" Skin="Gray">
    <Items>
        <telerik:RadMenuItem runat="server" ExpandMode="ClientSide" Text="Data">
            <GroupSettings ExpandDirection="Auto" Flow="Vertical" />
            <Items>
                <telerik:RadMenuItem runat="server" ExpandMode="ClientSide" Text="Select">
                    <GroupSettings ExpandDirection="Auto" Flow="Vertical" />
                </telerik:RadMenuItem>
                <telerik:RadMenuItem runat="server" ExpandMode="ClientSide" Text="Update">
                    <GroupSettings ExpandDirection="Auto" Flow="Vertical" />
                </telerik:RadMenuItem>
            </Items>
        </telerik:RadMenuItem>
        <telerik:RadMenuItem runat="server" ExpandMode="ClientSide" Text="Extras">
            <Items>
                <telerik:RadMenuItem runat="server" ExpandMode="ClientSide" Text="Color">
                    <GroupSettings ExpandDirection="Auto" Flow="Vertical" />
                </telerik:RadMenuItem>
                <telerik:RadMenuItem runat="server" ExpandMode="ClientSide" Text="Sound">
                    <GroupSettings ExpandDirection="Auto" Flow="Vertical" />
                </telerik:RadMenuItem>
            </Items>
            <GroupSettings ExpandDirection="Auto" Flow="Vertical" />
        </telerik:RadMenuItem>
    </Items>
    <ItemTemplate>
        <asp:CheckBox ID="CheckBox1" runat="server" />
    </ItemTemplate>
</telerik:RadMenu>
When you run the application, the RadMenu items all show check boxes with no labels:
This is hardly useful! To override the Text property of the check box in the template, use a DataBinder.Eval statement:
<itemtemplate>
    <asp:CheckBox ID="CheckBox1" runat="server" Text='<%# DataBinder.Eval(Container, "Text") %>'/>
</itemtemplate>
In the DataBinder.Eval statement, Container is the RadMenuItem and "Text" identifies the Text property of that item. (If you wanted to bind to the Value property, for example, you could use the string "Value" instead.)
In this example, the first parameter to the DataBinder.Eval statement is Container , because the items are statically bound. If the menu was bound to a data source, then you must use Container.DataItem instead. e.g.<%#DataBinder.Eval(Container.DataItem, "TextField") %>
In addition to adding a DataBinder.Eval statement, you must also explicitly call the DataBind method for the items so that the template has access to the Text property:
protected void Page_Load(object sender, EventArgs e) {
    for (int i = 0; i < RadMenu1.Items.Count; i++)
    {
        RadMenu1.Items[i].DataBind();
    }
}
Protected Sub Page_Load(ByVal sender As Object, ByVal e As EventArgs) Handles Me.Load
    Dim i As Integer = 0
    While i < RadMenu1.Items.Count
        RadMenu1.Items(i).DataBind()
        i = i + 1
    End While
End Sub
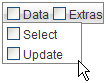
Now the text of the menu items appears on the check boxes: