UI Interaction Controls
In this article you can examine the RadMap’s UI elements the end user can interact with. The Telerik Map provides the following distinct controls – Navigator, Zoom and Attribution.
End User Experience with the UI Controls
The Navigator and the Zoom controls allow the user to pan and zoom the map. Their value are persisted through the server post back. The Attribution is the map footer where additional information about the Map Tile Service rights could be provided to the end user.
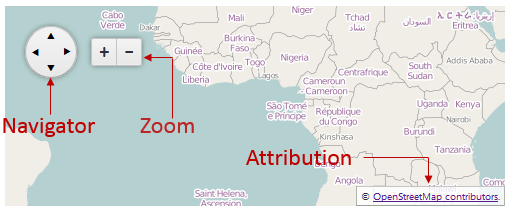
In Figure 1 you can examine the distinct controls in a simple RadMap setup, provided in Example 1.
Figure 1: Illustration of the Navigator, Zoom and Attribution UI elements.
Example 1: UI elements enabled by default in the RadMap control.
<telerik:RadMap RenderMode="Lightweight" runat="server" ID="RadMap1" Width="500" Height="200">
<CenterSettings Latitude="1" Longitude="1" />
<LayersCollection>
<telerik:MapLayer Type="Tile" Subdomains="a,b,c"
UrlTemplate="https://#= subdomain #.tile.openstreetmap.org/#= zoom #/#= x #/#= y #.png"
Attribution="© <a href='https://osm.org/copyright' title='OpenStreetMap contributors' target='_blank'>OpenStreetMap contributors</a>.">
</telerik:MapLayer>
</LayersCollection>
</telerik:RadMap>
Controlling the Visibility of the UI Controls
In the RadMap you can easily enable or disable the UI controls using the ControlsSetting inner tag and set the desired controls to true or false. If such options are not set, the controls are enabled by default.
Example 2 demonstrates how to create a Map with disabled Navigator, Zoom and Attribution elements.
Example 2: Disabling the UI Controls of the RadMap.
<telerik:RadMap RenderMode="Lightweight" runat="server" ID="RadMap1">
<ControlsSettings Attribution="false" Navigator="false" Zoom="false"></ControlsSettings>
<LayersCollection>
<telerik:MapLayer Type="Tile" Subdomains="a,b,c"
UrlTemplate="https://#= subdomain #.tile.openstreetmap.org/#= zoom #/#= x #/#= y #.png"
Attribution="© <a href='https://osm.org/copyright' title='OpenStreetMap contributors' target='_blank'>OpenStreetMap contributors</a>.">
</telerik:MapLayer>
</LayersCollection>
</telerik:RadMap>
Repositioning the UI Controls
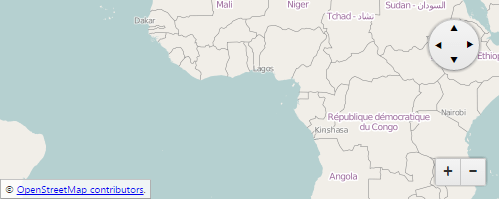
In Example 3 you can see how the AttributionSettings, NavigatorSettings and ZoomSettings inner tags and their Position property are used to change the controls’ position. The result is illustrated in Figure 2.
Figure 2: RadMap with repositioned UI controls.
Example 3: How to reposition the Map’s UI controls.
<telerik:RadMap RenderMode="Lightweight" runat="server" ID="RadMap1" Width="500" Height="200">
<CenterSettings Latitude="1" Longitude="1" />
<ControlsSettings>
<AttributionSettings Position="BottomLeft" />
<NavigatorSettings Position="TopRight" />
<ZoomSettings Position="BottomRight" />
</ControlsSettings>
<LayersCollection>
<telerik:MapLayer Type="Tile" Subdomains="a,b,c"
UrlTemplate="https://#= subdomain #.tile.openstreetmap.org/#= zoom #/#= x #/#= y #.png"
Attribution="© <a href='https://osm.org/copyright' title='OpenStreetMap contributors' target='_blank'>OpenStreetMap contributors</a>.">
</telerik:MapLayer>
</LayersCollection>
</telerik:RadMap>