How to: Create One-to-Many Associations
This article is relevant to entity models that utilize the deprecated Visual Studio integration of Telerik Data Access. The current documentation of the Data Access framework is available here.
This topic demonstrates how to create one-to-many associations. Two common approaches will be discussed here:
- In the first scenario, you will use the (Default) option for a foreign key. This is the most simple and straightforward case for creating associations. Using the (Default) option for a foreign key means that when you migrate your database schema to the latest model state, Telerik Data Access will create a foreign key that will handle the one-to-many relation.
- The second scenario is more complex, however it gives you more control over the associations. In this case, you are going to create explicitly a new property in the child entity. You will use this property as a foreign key.
Using the (Default) Option
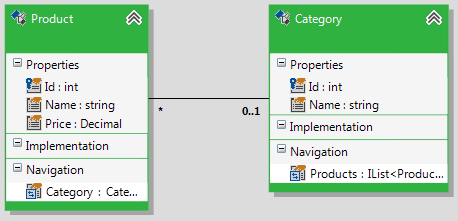
Suppose, you have the following domain model:

The process of creating a new one-to-many relationship between your entities includes the following steps:
- Open the Toolbox and select the Association item.
-
Select the objects to be included in the association by clicking the child entity in the design surface and then clicking the parent entity on the design surface. For example if you want the Product entity to contain the foreign key, then you have to click it first and then click on the Category entity. Doing this will open the Association Editor dialog.

-
The first step here is to specify the foreign key property for the child (Source) class. Note that Telerik Data Access automatically resolves the primary key property of the entity at the other side of the navigation (i.e. the Target class or the parent class). However, Telerik Data Access cannot resolve the foreign key property in the Source class. That's why you have to specify it manually (explicitly). When you click on the Product Properties grid, a new drop-down with all properties of the Source class will appear:
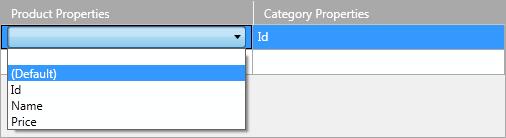
Here you should select the foreign key property. Select the (Default) option.
- You could change the names for the navigation properties.
-
When you click OK, a new association between the Product and Category classes will be created in the Visual Designer.
Next Steps
The next step is to create/migrate your database schema to the latest model state. For that purpose, you will need to use the Update Database from Model Wizard. The generated script should be similar to this.
-- OpenAccessModel.Category
CREATE TABLE [category] (
  [nme] varchar(255) NULL,                -- _name
  [id] INT NOT NULL,                      -- _id
  CONSTRAINT [pk_category] PRIMARY KEY ([id])
)
GO

-- OpenAccessModel.Product
CREATE TABLE [product] (
  [price] NUMERIC(20,10) NOT NULL,        -- _price
  [nme] varchar(255) NULL,                -- _name
  [id] INT NOT NULL,                      -- _id
  [id2] INT NULL,                         -- _category
  CONSTRAINT [pk_product] PRIMARY KEY ([id])
)
GO

CREATE INDEX [idx_product_id2] ON [product]([id2])
GO

ALTER TABLE [product] ADD CONSTRAINT [ref_prdct_category] FOREIGN KEY ([id2])
REFERENCES [category]([id])
GO
Using Explicit Foreign Key Property
This section demonstrates how to create a new one-to-many association when the child entity exposes an explicitly created property that will be used as a foreign key.
Suppose, you have the following domain model:

Take a look at the Product entity. There is a property named CategoryId, which will be used as a foreign key to the Category. To create a new one-to-many association:
- Open the Toolbox and select the Association item.
-
Select the objects to be included in the association by clicking the child entity in the design surface and then clicking the parent entity on the design surface. For example if you want the Product entity to contain the foreign key, then you have to click it first and then click on the Category entity. Doing this will open the Association Editor dialog.

-
The first step here is to specify the foreign key property for the child (Source) class. Note that Telerik Data Access automatically resolves the primary key property of the entity at the other side of the navigation (i.e. the Target class or the parent class). However, Telerik Data Access cannot resolve the foreign key property in the Source class. That's why you have to specify it manually (explicitly). When you click on the Product Properties grid, a new drop-down with all properties of the Source class will appear:

Here you should select the foreign key property. Select the property that will represent the foreign key. In the case of this example, this is the CategoryId property.
- Click OK to close the wizard.
Next Steps
Now, Telerik Data Access will use the CategoryId column for a foreign key. For example, when you create/migrate your database schema to the latest model state, the end script should be:
-- OpenAccessModel.Category
CREATE TABLE [Categories] (
  [NAME] varchar(255) NULL,               -- _name
  [Id] INT NOT NULL,                      -- _id
  CONSTRAINT [pk_Categories] PRIMARY KEY ([Id])
)
GO

-- OpenAccessModel.Product
CREATE TABLE [Products] (
  [Price] NUMERIC(20,10) NOT NULL,        -- _price
  [NAME] varchar(255) NULL,               -- _name
  [Id] INT NOT NULL,                      -- _id
  [CategoryId] INT NOT NULL,              -- _category
  CONSTRAINT [pk_Products] PRIMARY KEY ([Id])
)
GO

CREATE INDEX [idx_Prdcts_CtgryId] ON [Products]([CategoryId])
GO

ALTER TABLE [Products] ADD CONSTRAINT [ref_Prdcts_Ctgries]
FOREIGN KEY ([CategoryId]) REFERENCES [Categories]([Id])
GO