Performing Delete Operations
This article is relevant to entity models that utilize the deprecated Visual Studio integration of Telerik Data Access. The current documentation of the Data Access framework is available here.
With the OpenAccessLinqDataSource control, you can create ASP.NET Web pages that enable users to insert, update, and delete data. You don't have to write any additional code, because the OpenAccessLinqDataSource control dynamically performs these operations. To let users modify data, you can enable insert, update, and delete operations on the OpenAccessLinqDataSource control. You can then connect the control to a data-bound control that lets the users insert, update, and delete data, such as the RadGrid control.
This topic describes how to enable the OpenAccessLinqDataSource control to automatically handle delete operations. Finally, the topic makes an overview of the Deleting/Deleted events, exposed by the OpenAccessLinqDataSource control.
How to: Enable Automatic Deletes
To enable a data-bound control to automatically perform delete operations, you must do the following:
- Connect the OpenAccessLinqDataSource control to a domain model and specify the target table.
-
On the second page of the wizard (i.e. the Configure Data Selection page), you need to ensure that the following conditions are met:
-
You need to select all (*) properties for the specified entity. When you check the Select All (*) option, full entities are returned instead of results that contain individual properties. (*) is the default selection, i.e. all of the properties will be used. If you choose specific properties, you won't get an entity object back. Instead, you will get a projection, which cannot be change-tracked, and therefore cannot be updated. In this case automatic inserts, updates, and deletes are not allowed.

-
Switch to the Advanced tab page and check the Enable Automatic Updates option.
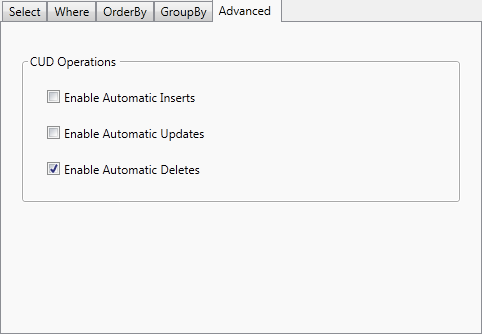
You should not have any GroupBy operations.
-
Click Finish to close the wizard.
If you have already created an OpenAccessLinqDataSource control on your web page, you don't need to re-configure it:
- Select the control in design time.
-
By using the Smart Tag panel, check the Enable delete option.

Note that, if you haven't used the Select All (*) option or you have grouping, then the Enable delete/insert/update options in the Smart Tag panel will not be available.
The following example shows the markup for part of an ASP.NET Web page that contains an OpenAccessLinqDataSource. The control is configured to enable the user to display and delete data in a table named Categories.
<telerik:OpenAccessLinqDataSource
   ID="OpenAccessLinqDataSource1"
   runat="server"
   ContextTypeName="OpenAccessLinqDataSourceDemo.EntitiesModel"
   ResourceSetName="Categories"
   EntityTypeName=""
   EnableDelete="True" />
Using the Deleting/Deleted Events
The Deleting event occurs before a delete operation. You could handle the Deleting event to validate the object to be deleted, to change a value before the delete operation, or to cancel the delete operation. The OpenAccessLinqDataSource control passes an OpenAccessLinqDataSourceDeleteEventArgs object to the event handler for the Deleting event. The OriginalObject property contains the data that will be deleted. The OpenAccessLinqDataSourceDeleteEventArgs derives from CancelEventArgs, i.e. it is a cancelable event. You can cancel the delete operation by setting the Cancel property to True.
protected void OpenAccessLinqDataSource_Deleting(object sender,
    Telerik.OpenAccess.Web.OpenAccessLinqDataSourceDeleteEventArgs e)
{
   Category categoryToDelete = e.OriginalObject as Category;
   if (categoryToDelete.CategoryName == "SUV")
   {
       e.Cancel = true;
   }
}
Protected Sub OpenAccessLinqDataSource_Deleting(ByVal sender As Object, _
    ByVal e As Telerik.OpenAccess.Web.OpenAccessLinqDataSourceDeleteEventArgs) _
    Handles OpenAccessLinqDataSource.Deleting
 Dim categoryToDelete As Category = TryCast(e.OriginalObject, Category)
 If categoryToDelete.CategoryName = "SUV" Then
  e.Cancel = True
 End If
End Sub
The Deleted event occurs when a delete operation has finished. You could handle the Deleted event to catch and process any exceptions from the delete operation.